
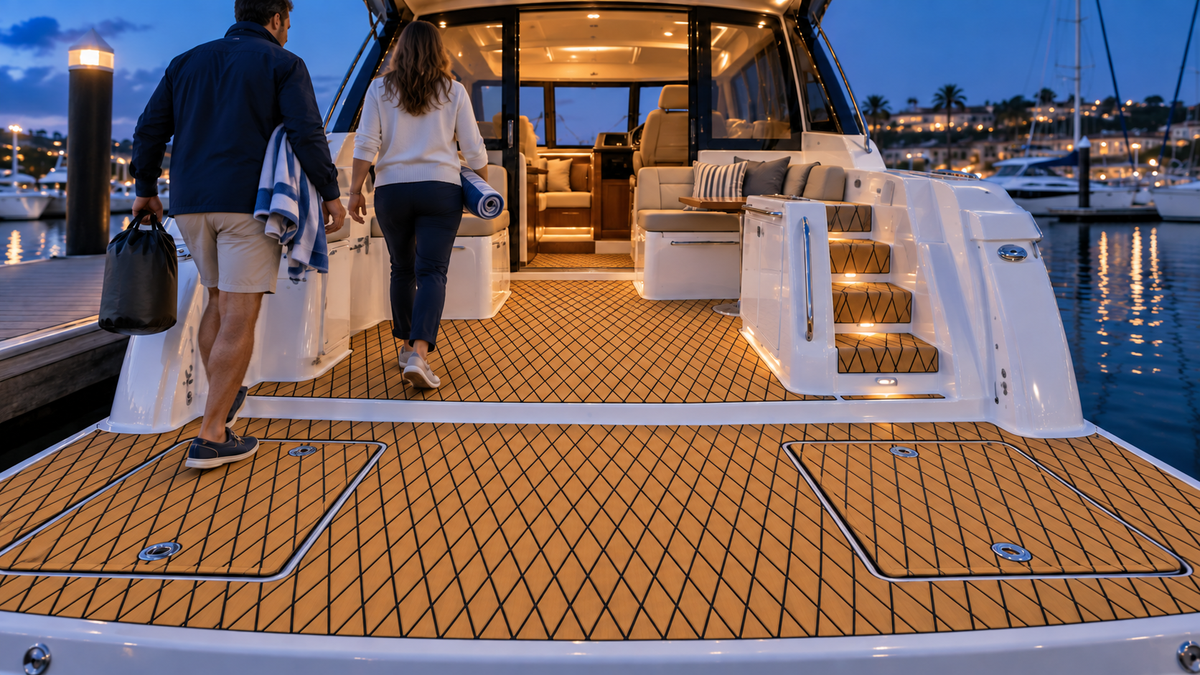
Traction-Focused Cabin Cruiser Flooring Around Cockpit Steps
A cabin cruiser cockpit often connects several different levels in a short distance: the swim platform, the main cockpit, a side step, and the cabin threshold. Those transitions matter more than an uninterrupted field of flooring. A layout that looks orderly from the dock can still place a seam where someone turns, hide a hatch edge, or make a narrow step harder to read after water and gear enter the cockpit.
This guide helps boat owners plan sheet-material flooring around cockpit steps and cabin thresholds. The goal is not to promise a universally safer deck or a guaranteed level of grip. Water, contaminants, wear, footwear, movement, and the underlying surface all affect traction. The useful task is to make each level change visible, preserve every moving or serviceable feature, and test the complete route on the actual boat before ordering or cutting.
Map the route before choosing panel shapes
Start where people actually board. Trace the normal path from the dock or swim platform into the cockpit, then continue to the helm, seating, cabin entrance, and any side-deck access. Repeat the walk while carrying the gear that commonly comes aboard. A route that feels open on an empty boat can become narrow once bags, coolers, fenders, lines, or removable seating are in place.
Mark every change in height. Include molded steps, raised thresholds, companionway lips, hatch frames, removable bridge pieces, and the edge between a swim platform and cockpit. Photograph each transition from both directions. A plan should show where a foot lands, where it turns, and where a person may pause while opening a door or hatch.
Focean’s cabin cruiser cockpit weather-planning guide provides a broader map of exposure, drainage, storage, and cabin boundaries. Use that wider map as context, then treat the step-and-threshold route as its own detailed planning problem.
Give every step a clear visual boundary
A level change should remain understandable when viewed from above and when approached at an angle. Avoid letting a busy pattern or a poorly placed panel break make two separate levels read as one surface. On a full-size paper template, draw the front edge of each tread, the vertical rise, nearby hardware, and the direction of travel.
Consider whether the pattern direction helps a person read the route or competes with it. A strong alignment that runs through the whole cockpit may look coherent, but it should not erase the logic of a step. Separate templates for separate levels are usually easier to check than one shape that tries to wrap a change in height.
Keep edges deliberate. A narrow strip at the front of a tread can be difficult to cut, align, inspect, and replace. A panel boundary should be chosen because it follows the actual geometry and service needs, not because it consumes every exposed patch of deck.
Preserve the cabin threshold and door movement
Open and close the cabin door, sliding panel, hatch board, or screen through its complete travel. Note the lowest clearance, the track, the drain path, and any latch or stop. Do not assume the threshold is simply another flat deck zone. It may be a water-management boundary or part of the door assembly.
Make a dedicated threshold template and label which side faces the cockpit. Leave every track, channel, fastener, seal, and service point visible unless the boat and selected flooring instructions clearly support another treatment. After placing the paper template, operate the door several times and check it from inside and outside the cabin.
If the threshold is wet from boarding or rain, observe where the water travels before deciding on a panel edge. The flooring plan should work with the boat’s established drainage rather than redirecting water toward the cabin or trapping debris beside a track.
Keep hatches and service access independent
Cabin cruiser cockpits often place storage lids, engine access, table sockets, battery switches, drains, and utility panels near the main route. Outline each moving lid and its fixed frame as separate parts. Mark hinge travel, latch clearance, gutters, handles, and any point that must be inspected without removing unrelated flooring.
Test the loaded cockpit, not only the bare surface. Return seats, tables, coolers, and other removable equipment before approving the panel map. Open every lid while someone stands in the normal waiting position. If a person must step onto a hatch to reach the cabin, that relationship belongs in the plan.
The guide to flooring panels around hatches explains how to separate lids, fixed frames, gear footprints, and future repair boundaries.
Plan for wet-foot traffic without making a guarantee
Identify the wettest route, often from the swim platform or side boarding point toward the cockpit. Then mark where people change direction, step down, or pause at the cabin door. These are useful inspection zones because water and debris can affect how any surface feels underfoot.
A textured surface can support a traction-focused plan, but the layout cannot replace housekeeping or careful movement. Keep drains clear, remove loose debris, follow the selected product’s care instructions, and inspect edges and high-use areas. Footwear, bare feet, water, sunscreen, fish residue, cleaning products, and wear can change surface behavior.
For a related route-mapping example, see Focean’s deck-boat guide to swim and storage routes. Its boat type is different, but its method of tracing wet-foot movement, gear staging, moving lids, and drying access is useful.
Use lighting and contrast as planning inputs
Inspect the cockpit in the conditions when it is commonly used: bright daylight, shade under the hardtop, dusk, and the boat’s normal courtesy lighting. A threshold that is obvious at noon may be less distinct when the cabin interior is brighter than the cockpit or when bags cast shadows across a step.
Do not treat color alone as a safety feature. Instead, combine visible level boundaries, uncluttered travel space, maintained lighting, and a panel layout that does not cover step edges or controls. Take photographs from standing eye level rather than only from a low product-photo angle.
Build and test a full-size template set
- Draw the route map. Label boarding point, swim-platform transition, cockpit levels, cabin threshold, helm, seats, and normal gear positions.
- Template each level separately. Record bow and stern direction, port and starboard orientation, pattern direction, panel name, and excluded features.
- Dry-fit the complete set. Place every template together so a correction in one zone does not create a conflict in the next.
- Operate everything. Move doors, hatches, seats, tables, ladders, and service covers through their full travel.
- Walk the loaded route. Add the gear normally carried aboard and rehearse boarding, sitting, standing, turning, and entering the cabin.
- Run a final stop check. Pause if the substrate, drainage, door clearance, product compatibility, or installation method remains uncertain.
Save the approved templates with photographs and panel names. That record can make later inspection, equipment changes, or a single-panel revision easier to understand.
Use a step-and-threshold review table
| Zone | What to document | What to test |
|---|---|---|
| Swim-platform transition | Level change, ladder, hatch edges, drains, wet-foot direction | Boarding with normal gear and full ladder or hatch movement |
| Cockpit step | Tread shape, front edge, adjacent seating, handhold position | Approach from both directions in daylight and normal cockpit lighting |
| Cabin threshold | Door track, seal, channel, fasteners, water route | Complete door travel and inspection from both sides |
| Nearby hatch | Lid, fixed frame, hinge, latch, gutter, service purpose | Opening while the cockpit is loaded and the route remains in use |
How this topic differs from other cabin-cruiser guides
This article focuses on the short, multi-level travel route around cockpit steps and the cabin threshold. The existing cabin cruiser changing-weather guide addresses broader exposure, covered storage, drying, and inspection cycles. Focean’s cuddy-cabin layout guide covers whole-cockpit composition and connected zones. Use those resources when the project extends beyond the step-and-threshold route.
FAQ
Should flooring wrap over the front of a cockpit step?
Do not assume it should. Treat the tread and vertical rise as separate surfaces until the boat geometry and the selected product instructions are confirmed. A wrap can affect alignment, edge treatment, drainage, inspection, and replacement. Build separate full-size templates first.
Can the cabin door track be covered?
Keep the track, drainage channel, fasteners, seals, and operating clearances exposed unless exact instructions for the boat and selected product support a different approach. Test the door through its complete travel before any material is cut.
Does textured flooring guarantee traction on wet steps?
No. No deck surface should be treated as a traction guarantee. Water, contaminants, wear, footwear, maintenance, lighting, and movement all matter. Use a traction-focused layout together with clear routes, visible level changes, working lights, regular cleaning, and careful boarding practices.
Practical takeaway
Plan cabin cruiser flooring around the route people actually use. Mark every level change, protect the cabin threshold and drainage details, keep hatches independent, inspect the route under normal lighting, and dry-fit a complete labeled template set with the cockpit fully loaded. Review Focean’s current collection for exact-item information, then contact Focean with clear deck photographs, boat details, and product-specific questions when you need current guidance.
Share:
Install RIB Tender Flooring Around Tube Edges and Hardware
Walkaround Fishing Boat Flooring for Cold-Weather Trips