
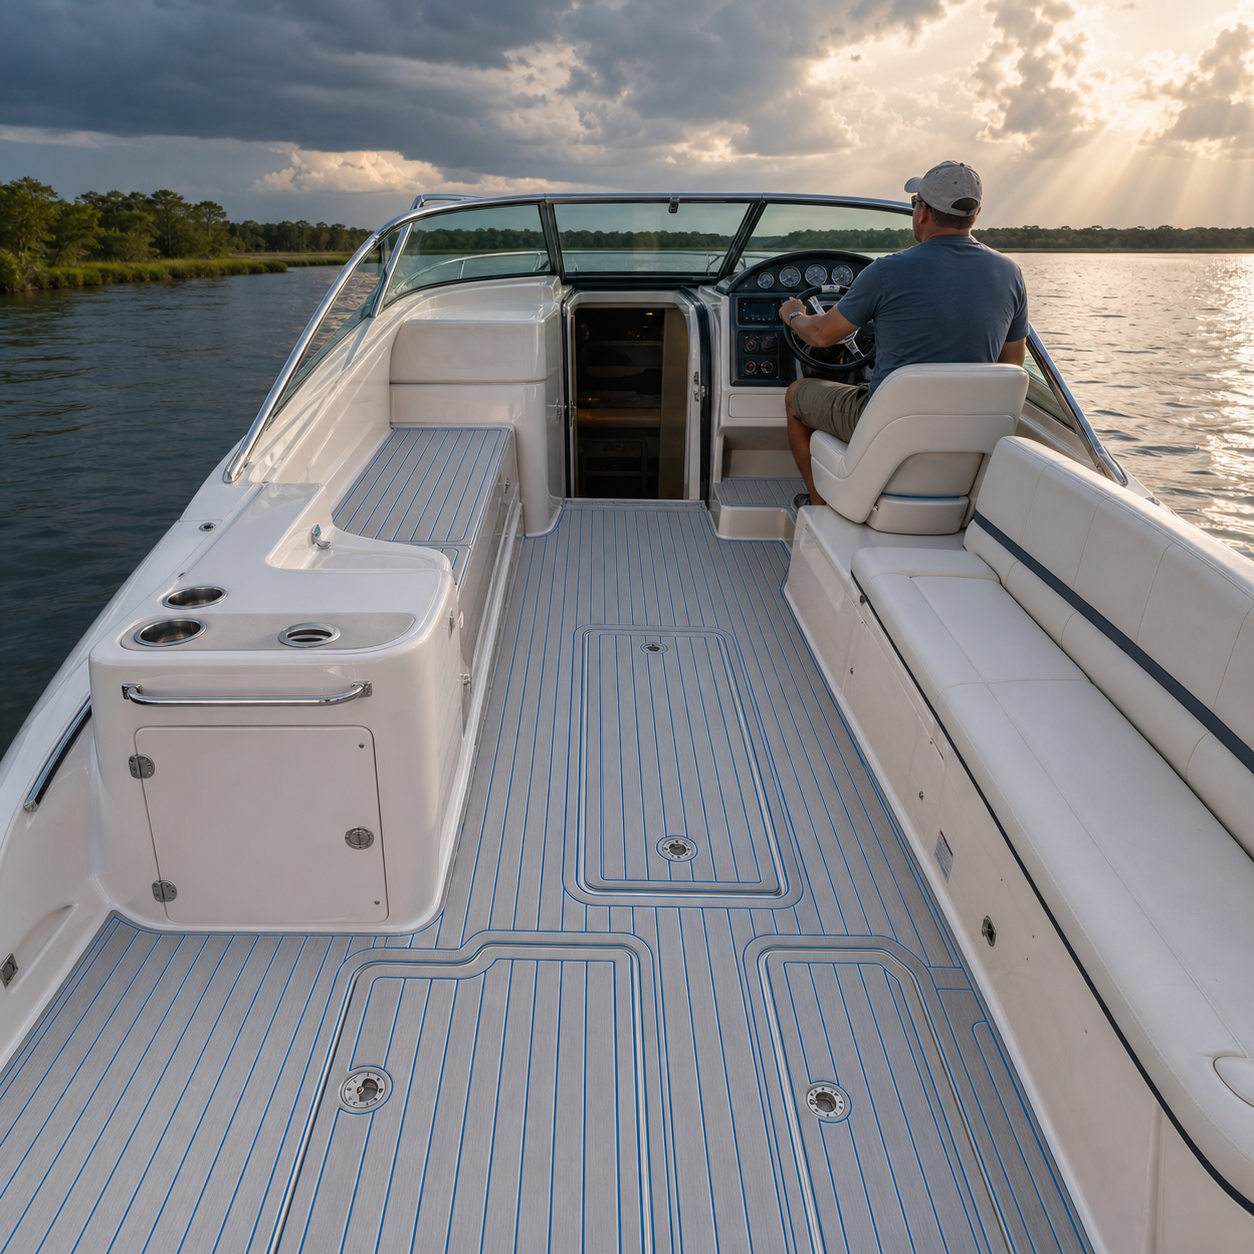
A cuddy cabin boat asks one cockpit to do several jobs. It is a passage to the small cabin, a place to handle lines, a social area at anchor, and often the main route between the swim platform and helm. That combination makes custom boat flooring for cuddy cabin cockpits a layout project, not simply a pattern choice. A good plan follows the boat’s real geometry, keeps the cabin entrance usable, preserves access and drainage, and creates a visual design that still makes sense when seats, hatches, and gear are back in place.
No general guide can confirm compatibility for every boat or flooring option. Start with the exact vessel, inspect the underlying deck, and obtain current product-specific instructions before ordering or installing anything. The practical goal is a cockpit plan you can explain, template, dry-fit, and check zone by zone.
Map the cockpit as connected zones
Begin with a top-down sketch and divide the cockpit by function. Most cuddy cabin layouts include several of the following areas:
- Cabin threshold: the transition between the open cockpit and the companionway or cabin door.
- Helm zone: the floor around the driver’s seat, pedals, footrest, and instrument console.
- Companion seating: walkways and foot space beside or behind the helm.
- Working cockpit: the open area used for lines, coolers, fishing gear, or folding furniture.
- Stern transition: the route to a swim platform, transom door, or boarding ladder.
- Service zones: hatches, drains, inspection plates, fasteners, and removable equipment.
Mark how people move between these zones. Pay special attention to pivots: turning out of the helm seat, stepping down from the cabin, moving around an engine cover, and carrying gear through the stern. These routes help determine where panel edges, seams, and pattern changes should—or should not—appear.
Treat the cabin entrance as its own design problem
The cabin entrance is what separates this project from a simple open-cockpit layout. It may include a raised lip, sliding door track, step, drain, hinge, or irregular molded corner. Do not extend a large panel across the threshold by default. First confirm how the door operates, where water is meant to travel, and which parts need clearance or future service.
Open and close the cabin door through its full movement. Test any removable boards, screens, or cushions. Measure the available flat surface without covering a track, fastener, label, or drainage gap. If the threshold changes height, make that transition visually obvious instead of disguising it with a continuous pattern.
A separate threshold template is often easier to verify than forcing the entrance into a larger cockpit piece. Label its cabin side, cockpit side, and centerline. During the dry fit, approach it from both directions while wearing the footwear normally used aboard. Water, sand, sunscreen, wear, and footwear can affect footing on any surface, so a thoughtful layout does not eliminate the need for care.
Inspect before making templates
Remove loose gear and clean the deck according to the boat builder’s guidance. Inspect the substrate in good light. Look for loose coatings, cracks, corrosion, old adhesive, uneven repairs, soft areas, sharp hardware, and places where water remains after cleaning. Flooring should not be used to hide damage or an unknown surface.
Photograph the bare deck from above and at each transition. Include the cabin threshold, seat bases, hatch edges, drains, table mounts, engine access, and stern gate. If the deck condition or material is uncertain, pause and consult an appropriate marine professional before continuing. A verified substrate is a useful design input; an assumption is not.
Build a reliable full-size template
For an irregular cockpit, a full-size template is more useful than a list of isolated dimensions. Use a stable boat feature—such as a verified centerline or molded reference edge—rather than the trailer, dock, or horizon. Work in manageable sections and keep every service opening separate when it must move independently.
Each template section should show:
- bow and stern direction;
- port and starboard orientation;
- the neighboring panel number;
- the intended pattern direction;
- hatches, drains, tracks, hinges, and hardware cutouts;
- areas that require clearance rather than coverage.
Do not assume the port and starboard sides are mirror images. Molded interiors, previous repairs, seating hardware, and cabin geometry can create small differences that matter at an edge. Verify both sides on the boat. Before transferring the template, reinstall removable seats, tables, coolers, and access covers so you can see how the complete cockpit functions.
Choose a pattern direction that organizes the space
Custom design works best when pattern direction supports the boat’s shape. A fore-and-aft line can visually connect the stern route to the cabin entrance. A centered border can emphasize symmetry around the companionway. Distinct panels can clarify level changes, hatches, or seating zones. The right choice depends on the actual cockpit, not a universal style rule.
Lay paper arrows or narrow tape strips on the dry deck to preview direction before committing. View the arrangement from the stern, helm, cabin doorway, and dock. Check it in bright light and shade. A pattern that looks balanced in a top-down drawing may feel crowded when interrupted by a pedestal, hatch, or angled companionway.
Color should also be evaluated in context. Compare candidate colors beside the upholstery, gelcoat, hardware, and existing cabin finishes. Screens can shift color, and lighting changes from open sun to the shaded cabin entrance. Use the exact available material or current supplier representation when making the final decision.
Plan seams around movement and access
Seams are part of the design, but they should not be scattered wherever the template became difficult. Place them where the boat’s geometry provides a logical break, such as a hatch perimeter, seat base, change in level, or boundary between cockpit functions. Avoid tiny filler pieces in frequent turning and boarding zones when a cleaner layout is possible.
Keep drains, scuppers, inspection plates, latches, and required labels accessible. Trace the path water takes toward each drain while the boat sits at its normal attitude. Do not bridge a channel or block a hatch gutter merely to preserve a visual line. A cockpit must continue to operate after the design is installed.
At the helm, test seat travel and rotation. At the stern, test the transom door and boarding route. At the cabin, test the door, step, and any removable closure. The dry fit is not complete until every moving part and service point has been operated with the templates in place.
Design for the cleaning routine you will actually follow
Cuddy cabin cockpits collect a mixed set of contaminants: dock dirt, sunscreen, food and drink spills, sand, fish residue, leaf litter, and water carried aboard from swimming. Evaluate whether the selected texture, grooves, seams, and edges can be cleaned with the time and tools available after a normal trip.
Ask for current cleaning guidance for the exact flooring choice. Do not assume that strong solvents, concentrated detergents, stiff brushes, or pressure washing are suitable. Remove loose debris, address spills before they dry, keep drainage paths open, and allow the cockpit to dry before covering it when conditions permit. Periodically inspect panel edges, thresholds, and areas around hardware.
Use a final design review before installation
Photograph the complete dry fit from the same viewpoints used during planning. Then review it with one scorecard:
- Does every panel fit the verified deck without hiding damage?
- Can the cabin door, helm seat, hatches, and stern access move freely?
- Are drains, tracks, labels, and service hardware unobstructed?
- Does the pattern align across neighboring pieces and remain clear at level changes?
- Are seams kept away from busy pivot points where practical?
- Does the color work with the cockpit and cabin in sun and shade?
- Are current preparation, compatibility, installation, and care instructions available for the selected option?
If any answer is uncertain, revise the template or obtain the missing information. It is less costly to redraw a boundary during a dry fit than to discover an access or alignment problem later.
Practical takeaway: make a doorway-to-stern proof sheet
Create one final sheet that shows the entire route from the cabin doorway to the stern. Add the panel numbers, pattern arrows, seams, level changes, drains, hatches, and all required clearances. Photograph that route with every template in place, then operate the cabin door, helm seat, access panels, and stern gate. This single proof sheet turns a decorative idea into a checkable cockpit plan.
Focean can be one option in your comparison. Contact Focean with clean deck photos, labeled templates or dimensions, substrate details, and the doorway-to-stern proof sheet to discuss current options for the specific project. Confirm the applicable product information and terms before making a decision.
Frequently asked questions
Should the cockpit flooring continue into the cuddy cabin?
Do not assume that one material or layout suits both areas. The cockpit and cabin can have different substrates, drainage, traffic, ventilation, and care needs. Evaluate each space separately and preserve the threshold, door operation, and any required clearances.
How should I handle a sliding cabin door track?
Keep the track and its fasteners accessible unless current boat and product instructions explicitly support another approach. Test the full door movement during the dry fit, and avoid placing an edge where it interferes with the track or collects debris.
Can a textured surface eliminate slip risk in the cockpit?
No. Texture does not remove slip risk. Water, contaminants, wear, maintenance, and footwear all affect traction. Preserve drainage, clean residue promptly, and move carefully around thresholds and changing deck levels.
What information should I send when asking about flooring options?
Send clear deck photos, the boat’s exact details, verified substrate information, labeled templates or dimensions, and close views of the cabin threshold, drains, hatches, and hardware. Ask for current information that applies to the specific option under consideration.
Ready to organize the redesign? Build the doorway-to-stern proof sheet, complete the full dry fit, and contact Focean with the verified project details when you are ready to discuss current flooring options.
Share:
Boat Flooring for Bay Boats in Changing Weather: A Planning Guide
Boat Flooring for Express Cruiser Cockpits: A Buyer’s Guide