
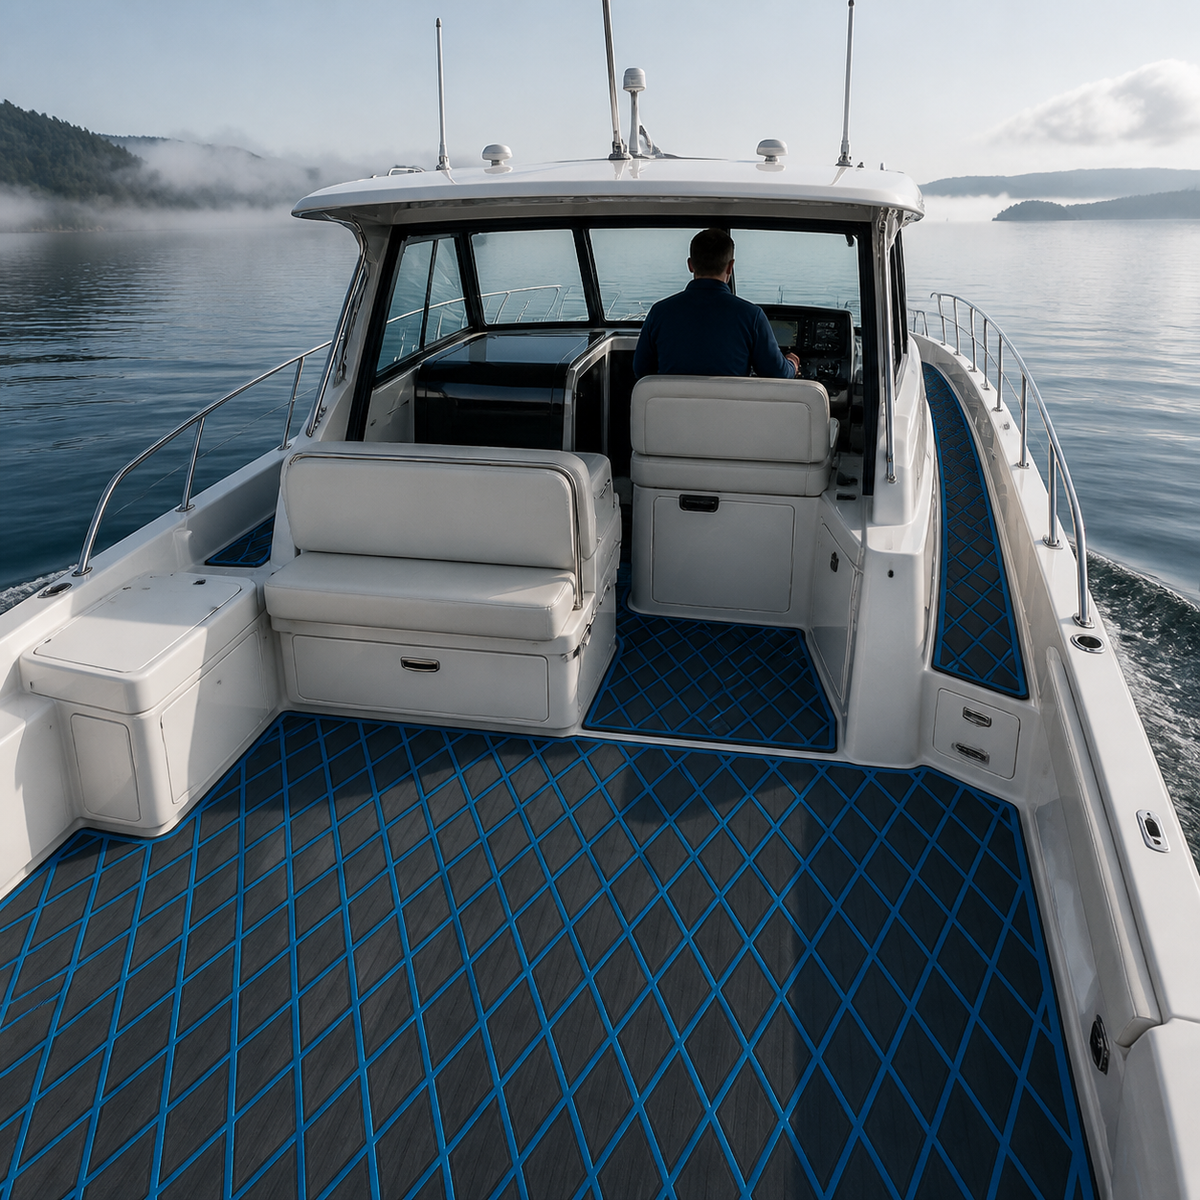
A cabin cruiser can move from cool mist to direct sun, rain, spray, and a damp marina berth in one outing. That changing environment makes flooring decisions less about a single attractive sample and more about how the whole cockpit works. Water has to travel somewhere. Hatches still need to open. The step into the cabin must remain easy to inspect, and the surface needs a care routine that fits the way you actually use the boat.
This guide explains how to plan cabin-cruiser boat flooring by zone. It does not assume one material suits every deck or every climate. Instead, it helps you map exposure, drainage, access, cleaning, and seasonal checks before choosing a product.
Start with the weather path, not the color
Imagine a typical day from departure to tie-up. Shoes bring water aboard at the side deck or swim platform. Spray reaches the aft cockpit. Wet gear is placed beside a seat base. Rainwater follows the deck’s slope toward drains. Later, the boat may sit closed up while moisture remains around hatch edges or beneath loose equipment.
Draw that path on a simple deck sketch. Mark where water enters, where people stand, where gear lands, and where air circulation is limited. This immediately separates decorative areas from working zones. It also exposes places where a flooring panel could cover a drain, restrict a hatch, or hide a joint that needs routine inspection.
Changing weather also affects timing. A surface that looks dry from above may still hold moisture at an edge, under a removable object, or beside a threshold. Planning for visibility and access is therefore more useful than relying on broad promises about weather performance.
Map the cabin cruiser by functional zone
Aft cockpit
The aft cockpit usually handles boarding, conversations, fishing gear, dock lines, and food or drink spills. It is often the largest uninterrupted flooring area, but it should not be treated as one simple rectangle. Identify seat pedestals, table mounts, deck fills, drains, inspection plates, and the swing path of every hatch.
Where panels meet, choose seam locations that remain visible and reachable. Avoid placing a seam where standing water routinely collects or where a chair leg repeatedly loads the edge. If the deck has several service points, smaller logical panels may be easier to inspect than one oversized piece.
Side passages and boarding points
Narrow side decks and boarding areas combine foot traffic with rail supports, cleats, curves, and changes in elevation. Create templates around the hardware rather than forcing a generic strip into the space. Leave the clearances specified by the boat and flooring instructions, and make sure fittings can still be checked without damaging the surrounding panel.
Traction is affected by water, debris, wear, footwear, and cleaning residue. A textured or traction-focused surface can be one part of the plan, but it does not replace careful movement, handholds, housekeeping, or the boat builder’s safety guidance.
Cabin threshold
The transition between cockpit and cabin deserves special attention. Confirm that added material will not interfere with a door, slider, track, seal, or drain. Check the full travel of the door with a temporary sample or template in place. Keep the threshold easy to clean and inspect, because it is a natural collection point for grit and moisture.
Do not bridge a moving joint or cover a drainage channel for the sake of a continuous visual pattern. A neat transition strip or deliberate panel break can be more practical than trying to make two different environments behave as one.
Helm and companion seating
At the helm, map the operator’s normal standing and seated positions, then check access to footrests, panels, fire-safety equipment, and electrical service points. Around companion seating, look for removable cushions, under-seat lockers, and table hardware. Flooring should support the layout without turning ordinary service into a removal project.
Evaluate a flooring option with conditional questions
Product labels often compress several decisions into a few appealing phrases. Expand them into questions that can be answered for the exact item you are considering:
- Which deck materials and finishes are listed as compatible?
- What surface preparation does the manufacturer require?
- Is the product intended for the expected sun, moisture, and temperature exposure?
- How should edges, seams, curves, and hatch openings be finished?
- Which cleaners and tools are approved, and which should be avoided?
- What are the current terms for the exact SKU, including returns or support?
If you are comparing EVA foam boat flooring with another marine surface, use the same checklist for every option. Comfort underfoot, appearance, cleaning effort, repair strategy, and access requirements all matter, but their importance changes by zone. Ask for documentation instead of assuming a category-level statement applies to a specific product.
Make templates that preserve access
A template is more than an outline. It should record panel direction, alignment marks, hatch clearances, drain locations, hardware, and the intended seam plan. Label each piece so that a dry layout can be reconstructed before anything is installed.
Begin with clean paper, plastic film, or another suitable templating medium recommended for the project. Trace fixed boundaries carefully, then mark items that must stay uncovered. Test doors, lids, and access plates with the template in place. On curved or irregular sections, use reference points that let you check the shape from more than one direction.
Before ordering or cutting, photograph the entire cockpit, each threshold, every hatch, the drains, and close views of the existing surface. These images make it easier to discuss compatibility with a seller or installer. When reviewing Focean’s current boat-flooring listings, verify the exact product details and instructions for the selected item rather than carrying assumptions from another listing.
Plan for drainage and drying
Flooring should work with the original drainage design, not conceal it. Follow the boat manufacturer’s guidance for scuppers, channels, limber paths, and service openings. Keep drains clear during the dry-fit stage and recheck them after every panel is positioned.
After rain or washdown, remove loose gear that blocks airflow and look for water along edges and around hardware. Open permitted access areas when appropriate and follow the boat’s ventilation guidance. If moisture repeatedly appears in one location, investigate the source rather than treating the visible surface as the whole problem.
A simple post-outing routine can include removing grit, using approved cleaning methods, allowing the deck to dry, and checking that drains remain open. Avoid introducing a strong cleaner or abrasive tool without confirming compatibility for the exact surface.
Use a seasonal inspection rhythm
Changing weather creates repeated opportunities to inspect the deck. At the start of the boating season, review edges, seams, hatch clearances, hardware cutouts, and areas that stayed covered during storage. During regular use, pay attention to changes in feel, movement at an edge, trapped debris, or slow drainage. Before storage, clean according to the product instructions and document any area that needs attention.
Photographs taken from the same positions make comparisons easier. They can help you distinguish a new issue from a mark that was already present. If a panel, backing, or substrate appears damaged, stop treating it as a cosmetic cleaning problem and consult the relevant product or boat guidance.
Practical takeaway: build a one-page deck brief
Before choosing cabin-cruiser boat flooring, create a one-page brief with five sections:
- Boat and deck: model, deck material, existing finish, and known repairs.
- Exposure: sun, rain, spray, storage conditions, and typical season.
- Zones: cockpit, helm, side passages, boarding point, and cabin threshold.
- Access: hatches, drains, fills, fasteners, doors, and service panels.
- Care: normal messes, available drying time, approved cleaners, and inspection routine.
This brief turns a vague flooring search into a practical compatibility conversation. It also gives you a record to revisit if the boat’s layout or use changes.
Frequently asked questions
Can one flooring material cover both the cockpit and cabin?
Possibly, but do not assume it should. The two areas can have different substrates, moisture exposure, cleaning needs, door clearances, and finish expectations. Confirm compatibility and installation requirements for each zone.
Should flooring cover access hatches?
Hatches and service points should remain identifiable and operable. A panel can sometimes be cut to follow a hatch, but the layout must preserve the opening path, required clearances, hardware access, and inspection needs.
How do I choose flooring for wet weather?
Start with drainage, drying, compatible cleaning, and documented product suitability for the expected exposure. Texture can support a traction-focused design, but no surface removes the need to manage water, contaminants, footwear, and safe movement.
What should I send when asking about fit?
Send the one-page deck brief, overall deck dimensions, clear photographs, close views of the substrate, and details of hatches, drains, and thresholds. Ask the seller to confirm current information for the exact item you are considering.
Next step: Review Focean’s current boat-flooring listings, compare the exact instructions with your deck brief, and contact Focean with photos and questions before ordering.
Share:
Comfortable Center-Console Boat Flooring: Plan Every Standing Zone
Camouflage Boat Flooring for Center Consoles: A Design Guide