
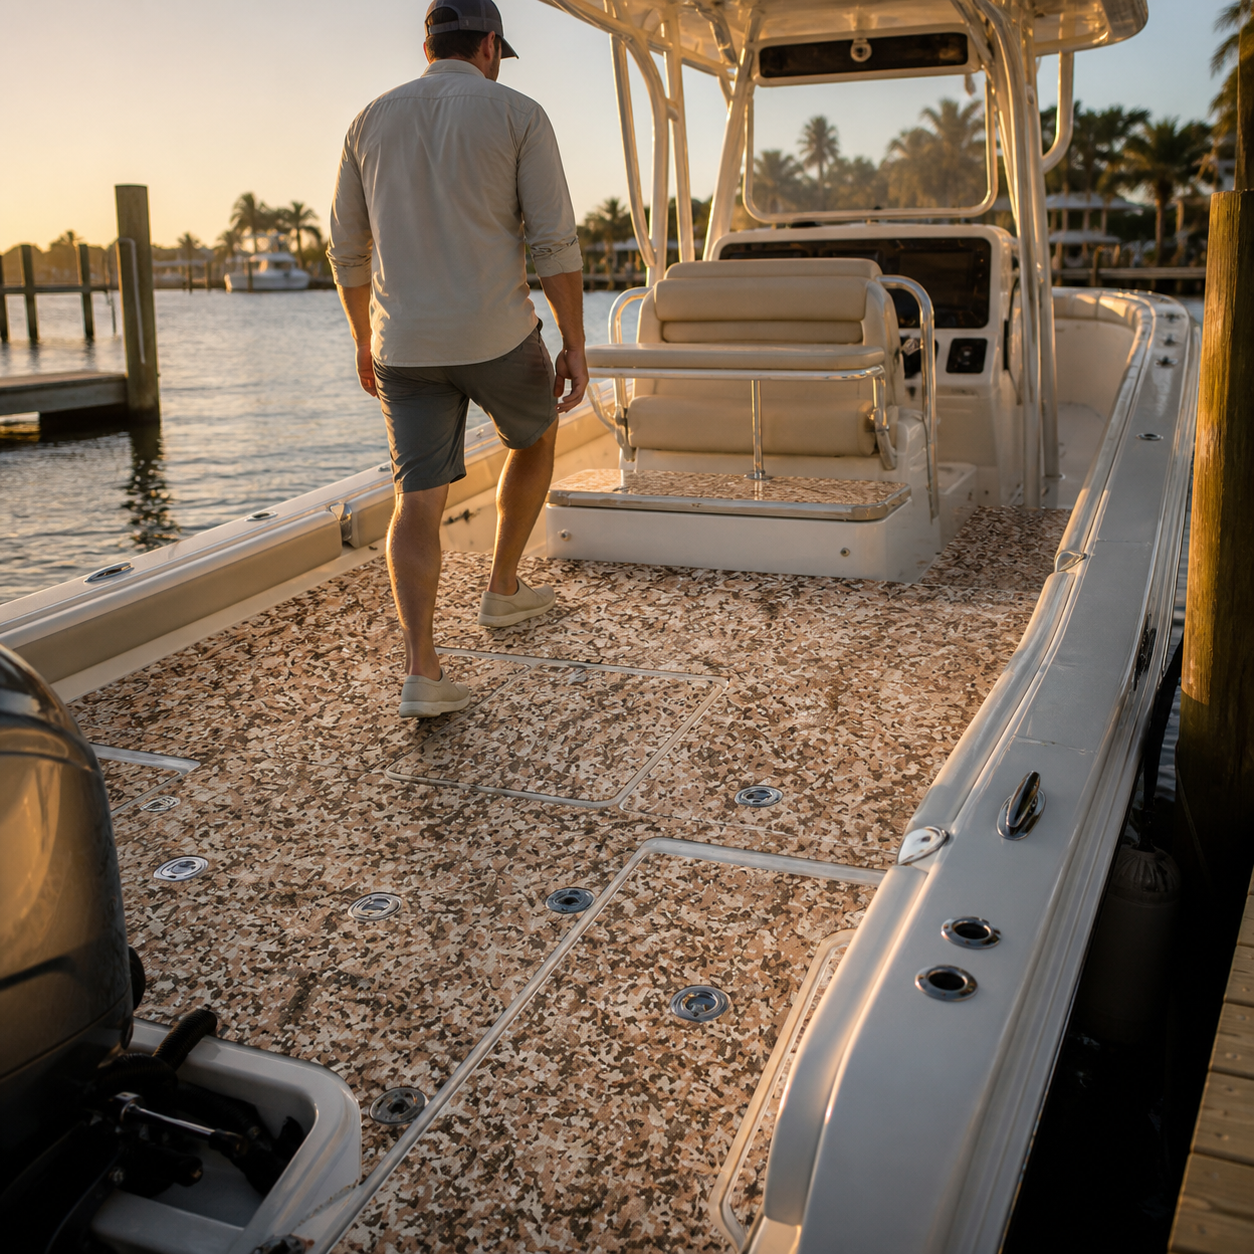
Camouflage boat flooring can give a center-console deck a strong visual identity, but a busy pattern also changes how the eye reads hatches, hardware, walkways, and work areas. The best result is not simply the boldest sheet. It is a layout that still makes the boat easy to understand when you are boarding, fishing, cleaning, or opening a service point.
This guide focuses on that design problem. It explains how to plan pattern scale, contrast, panel boundaries, and deck zones before choosing or cutting material. It does not assume a camouflage surface suits every boat, and it does not treat an illustrated scene as proof of real-world performance. Use the process to build a clear design brief, then confirm compatibility and current instructions for the exact flooring you are considering.
Start with the reason you want camouflage flooring
“Camouflage” can mean several different things on a boat. Some owners want a practical fishing look. Others want to connect the deck with tan upholstery, a dark hull stripe, or natural shoreline colors. A few simply prefer an irregular pattern because it feels less formal than straight grooves or faux planks.
Write down the visual goal in one sentence. For example: “Use a warm, low-contrast pattern to connect the white interior with beige seating while keeping every hatch easy to see.” That sentence is more useful than choosing a pattern from a small screen. It gives you a way to reject options that are attractive in isolation but confusing across the full cockpit.
Also decide whether camouflage should cover the entire project or act as an accent. A center-console boat may look more deliberate when the main cockpit, helm zone, and raised casting area follow one system, while narrow steps or small lids use a quieter companion color. The correct balance depends on the boat’s geometry, not on a universal style rule.
Photograph and map the deck before judging a pattern
Take wide photographs from the stern, bow, port side, and starboard side. Then photograph every hatch, drain, deck plate, pedestal base, console edge, cooler position, livewell lid, and boarding point. A pattern that looks calm in a close-up can feel much busier when repeated around many cutouts.
On a simple deck sketch, mark five types of area:
- Traffic lanes: boarding routes and side passages.
- Standing zones: helm, leaning-post, casting, and landing areas.
- Moving boundaries: hatch lids, doors, removable seats, and cooler slides.
- Service points: drains, fills, fasteners, and inspection plates.
- Visual anchors: console centerline, seat bases, gunwales, and major deck edges.
This map separates the design problem from the material decision. For a broader way to organize helm, fishing, boarding, and passage areas, see Focean’s center-console flooring zone guide.
Choose pattern scale for the size of the deck
Pattern scale describes how large the light and dark shapes appear. On a compact cockpit with many lids and fittings, a very large pattern may break unpredictably from panel to panel. An extremely fine pattern can create the opposite problem: hatch edges and small hardware may visually disappear into the surface.
Compare candidates at full size whenever possible. Place a representative section near a hatch, beside the console, and next to the upholstery. Step back to the normal viewing distance. Look at it in bright light and shade, then photograph it from the angles you use when boarding and working on deck.
Do not rely on color names alone. “Sand,” “tan,” “brown,” and “gray” can describe very different combinations. Compare the actual candidate with the boat’s white gelcoat, metals, cushions, canvas, and hull accents. The goal is coordination, not a perfect color match that may make important boundaries harder to read.
Keep hatches and hardware visually legible
A camouflage layout should never make deck access mysterious. Every hatch needs a clear opening path, appropriate clearance, and an edge that can be found quickly. Decide whether pattern continuity across a lid helps the design or hides the boundary too effectively.
One approach is to align the pattern across adjacent panels while keeping a deliberate border or reveal around the hatch. Another is to rotate or frame the lid so it reads as a separate functional element. Test the idea with paper templates or printed pattern blocks before cutting anything permanent.
Hardware deserves the same attention. Do not cover drains, fasteners, deck plates, fills, or other service items merely to preserve the pattern. Keep the clearances required by the boat and flooring instructions. If a fitting sits inside a visually busy area, a clean margin around it can make inspection easier and produce a more finished appearance.
Use pattern direction to organize the center console
Irregular camouflage still has direction. Clusters, brushed grain, or repeated shapes can pull the eye forward, sideways, or diagonally. Choose a main reference line—often the boat centerline or the console—and use it consistently across the largest visible zones.
Then decide where a direction change is intentional. A raised casting deck, step, or separate helm pad may justify its own orientation. Random changes between neighboring pieces usually look like cutting errors, while planned changes can clarify a transition.
Create a numbered panel map before making final templates. Draw arrows showing pattern direction and mark which edges must align. Focean’s center-console installation planning guide explains how reference lines, panel maps, full-size templates, and dry fitting work together.
Judge the design during real deck tasks
A design review should include more than standing back at the marina. Walk the normal route from the boarding point to the helm. Open each hatch. Place a tackle box or cooler where it normally sits. Check whether small tools, lines, and loose objects remain easy to notice against the pattern. Confirm that the layout does not distract from drains, steps, or changes in level.
Think about cleaning, too. An irregular pattern may make some debris less obvious from a distance, but that is not a substitute for inspection. You still need to see residue around hatch gaps, hardware, seams, and drains. Choose a care routine for the exact surface and avoid assuming that appearance indicates cleanliness.
If you are still deciding between surface categories, compare them with the same deck map rather than comparing slogans. The EVA foam and marine vinyl center-console comparison covers standing feel, seams, cleaning, access, and repair planning without treating one option as universally better.
Build a design brief before asking for options
A useful request to a seller or installer contains enough information to discuss the actual boat. Include:
- Boat model and year, plus the current deck material and finish.
- Wide deck photographs and close views of hatches, drains, and hardware.
- A marked deck sketch with traffic, standing, service, and access zones.
- The preferred color family and an explanation of what it should coordinate with.
- Full-size pattern references viewed beside the boat, not only screenshots.
- Questions about exact-product compatibility, preparation, cutting, cleaning, and current terms.
When reviewing Focean’s current boat-flooring listings, use this same brief for every candidate. Verify the details for the exact item under consideration rather than applying information from one listing to another.
Practical takeaway: run a visibility test
Before committing to camouflage boat flooring, perform a simple visibility test. Place a full-size pattern reference near one large hatch, one small fitting, one traffic lane, and one standing zone. View each location from normal working distance in sun and shade. If boundaries, hardware, or loose objects become difficult to notice, adjust the pattern scale, contrast, borders, or coverage plan.
The strongest custom design is not the one that calls the most attention to itself. It is the one that gives the center-console boat a coherent character while keeping its working parts understandable.
Frequently asked questions
Should camouflage flooring cover every open deck area?
Not necessarily. Full coverage can create continuity, but a mixed layout may better separate steps, lids, service zones, or small accent areas. Base the decision on access, geometry, and visual clarity.
Should the pattern continue across hatch lids?
It can, provided the lid remains easy to identify and operate. Use full-size templates to test alignment, border treatment, clearances, and the complete opening path before cutting.
How do I know whether a camouflage pattern is too busy?
View it at full size beside the actual boat. If deck boundaries, hardware, loose gear, or changes in level become hard to recognize from normal working distance, the scale or contrast may be too demanding for that zone.
What should I confirm before ordering?
Confirm exact-product compatibility, surface preparation, template and cutting requirements, edge treatment, cleaning guidance, and current commercial terms. Provide clear deck photographs and measurements so questions are tied to the real layout.
Next step: Build the six-part design brief, review Focean’s current listings with the visibility test, and contact Focean with deck photographs and exact-product questions before ordering.
Share:
Boat Flooring for Cabin Cruisers in Changing Weather: A Planning Guide
Boat Flooring Around Sailboat Companionways: A Buyer’s Guide