
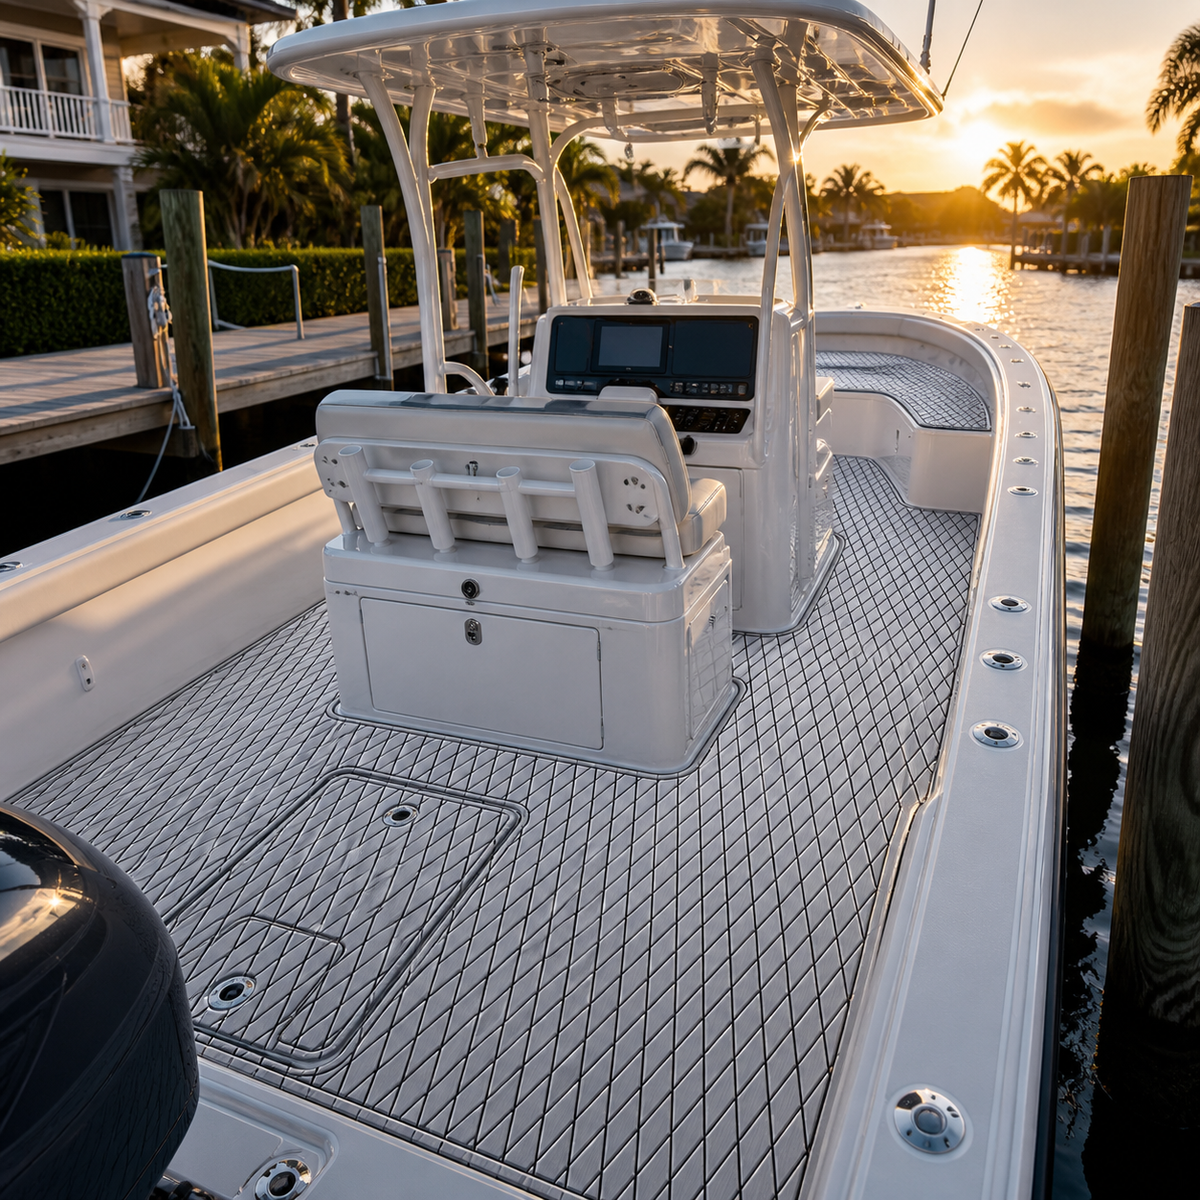
A sport-fishing cockpit is not simply an open patch of deck. It is a working space where anglers move around a fighting chair or leaning post, reach tackle, manage lines, open hatches, wash down the deck, and move between the helm and transom. A flooring plan that looks attractive in a small sample can become awkward when it ignores those movements.
That is why custom boat flooring for sport-fishing cockpits should begin with the layout, not the color. The best-looking result is usually the one that makes the cockpit feel organized while preserving access to every hatch, drain, fastener, and service point. This guide explains how to plan the design before choosing or cutting material.
Start with the way the cockpit is actually used
Walk through a normal fishing day before drawing any flooring panels. Where do people board? Where does the angler brace while working a fish? Which path does the crew take from the helm to the transom? Where do coolers, tackle bags, gaffs, or portable seats normally sit?
Mark these activity zones on a simple cockpit sketch. A practical plan often includes:
- a boarding route from the dock or swim platform;
- a central working zone with room to turn and step;
- clear paths around the console, leaning post, or fighting chair;
- access areas for livewells, fish boxes, storage, batteries, and pumps;
- edges around drains, deck hardware, and removable panels.
This exercise prevents decorative seams from landing in busy footpaths and helps identify places where a smaller removable flooring section may be more practical than one large panel.
Divide the design into purposeful zones
A sport-fishing cockpit can look more coherent when the flooring follows the boat's existing geometry. Use console bases, hatch outlines, seat boxes, gunwales, and transom features as natural boundaries. These reference points can guide the shape and direction of each panel.
Try to avoid creating many narrow pieces merely to fill irregular gaps. Thin strips can make the design look fragmented and may complicate fitting. Instead, group nearby areas into larger visual zones where the deck layout allows it. Keep service panels separate when they must remain removable.
Symmetry is useful, but it should not override function. Many cockpits are not perfectly symmetrical because of doors, ladders, rigging access, or equipment. A balanced design can still use different left- and right-side panel shapes as long as their margins, pattern direction, and visual weight feel related.
Choose a pattern direction that supports the boat
Lines and grooves influence how wide or long a cockpit appears. A lengthwise direction can visually extend the deck from transom to helm. A crosswise direction can emphasize width. Diamond or repeating geometric patterns can feel more neutral, but their centerline and spacing still need careful alignment.
Pick one dominant axis and use it consistently across the main cockpit. If a hatch interrupts the field, continue the pattern direction across its removable panel where practical. The hatch should remain easy to identify and open; visual continuity should never conceal an access point.
Before committing, place paper strips or painter's tape on the deck to represent the proposed pattern direction. View the cockpit from the dock, transom, helm, and standing eye level. A direction that looks correct in a top-down drawing may feel different from the normal boarding angle.
Plan borders, margins, and transitions
Consistent margins make a custom layout look intentional. Measure the visual gap between the flooring and surrounding edges such as hatch frames, seat bases, drains, and molded deck curves. The exact gap may change around obstacles, but abrupt changes should have a clear reason.
Transitions deserve special attention. Note every place where the cockpit meets a cabin threshold, side walkway, step, swim platform, or unlined deck area. Decide whether the flooring should stop at the transition, wrap around it, or continue as a separate aligned panel.
Do not cover drainage channels or place a decorative border where it could interfere with water flow. The existing deck should continue to manage water as designed. If the path is unclear, inspect the boat after a normal rinse and observe where water travels before finalizing the panel outline.
Make a dependable template
A template translates the design from an idea into cuttable shapes. Clean the cockpit enough to expose all panel edges, hardware, and seams. Photograph the entire area, then take closer photos of curves, corners, hatch hinges, drains, and obstructions.
Use a stable template material that can lie flat and hold its shape. Build the template in manageable sections, joining them carefully when needed. Label each section with its location, bow direction, top side, pattern direction, and neighboring panel. Add cutouts and access points explicitly rather than relying on memory.
Check the template in place before it leaves the boat. Verify:
- hatches can open fully without binding;
- drains and fasteners remain accessible;
- seat or equipment bases have suitable clearance;
- panel margins look consistent from normal viewing angles;
- joined template sections cannot shift relative to one another;
- the pattern direction is marked on every piece.
Record measurements as a cross-check, but do not assume a rectangular measurement captures a molded curve. Templates are especially valuable in older boats, where previous repairs or equipment changes may have altered the deck.
Use color and contrast with restraint
Cockpit flooring occupies a large visual area, so a small color chip can feel much stronger once installed across the deck. Compare options beside the boat's gelcoat, upholstery, canvas, hardware, and console rather than viewing them indoors by themselves.
Light and dark contrast can define a geometric pattern, while lower contrast can create a quieter surface. Consider how fishing residue, dock dirt, and routine rinsing may appear on each choice. This is an appearance and care decision, not a promise that one color will perform the same way in every setting.
Take photos of the samples in direct sun, shade, and evening light. Screens can shift color, so the physical comparison matters. If you are considering Focean, contact the team to ask whether samples are currently available, and confirm the exact color, surface, backing, care guidance, and terms for the option you are evaluating.
Review practical details before ordering
A beautiful drawing is not yet a complete order plan. Confirm the material and backing for the selected SKU, the condition and compatibility of the deck surface, the intended installation method, and how seams and edges should be handled. Ask what files or template format the supplier needs and whether the design proof shows final cut lines or only a visual concept.
Also confirm who is responsible for checking dimensions. A digital drawing can look precise while still reflecting an inaccurate template. Review labels, orientation, scale references, cutouts, and panel count before approving production.
If the existing deck has loose coating, damage, contamination, or unresolved drainage issues, address those conditions first. Flooring should not be used to hide a problem that may require inspection or repair.
Practical takeaway: use a four-view cockpit review
Before approving a custom layout, review it from four perspectives: the angler working in the cockpit, the crew member moving between stations, the owner opening every service panel, and the person seeing the boat from the dock. If the design supports all four views, it is more likely to feel integrated rather than added later.
Keep one marked master template, one complete photo set, and one approved drawing together. That record makes questions easier to resolve and provides a reference if a removable panel ever needs attention.
Frequently asked questions
Should the cockpit use one large flooring panel?
Not necessarily. Large panels can create a clean visual field, but hatches, equipment bases, access points, drainage paths, and installation handling may favor several coordinated sections. Let the boat's functional boundaries determine the panel plan.
How should a pattern cross a hatch?
Keep the dominant direction consistent when practical, but preserve a visible, usable edge around the hatch. The hatch must remain easy to locate, open, remove, and service. Function takes priority over perfect visual continuity.
Can I create a template from measurements alone?
Simple rectangular areas may be measured, but molded cockpits often include curves, tapers, radiused corners, and equipment added after manufacture. A full-size checked template usually communicates those shapes more clearly than a short list of dimensions.
What should I confirm with a flooring supplier?
Confirm the exact SKU, color, surface texture, backing, deck compatibility, template requirements, installation guidance, care instructions, current availability, and current commercial terms. Ask how design proofs should be reviewed and who confirms scale before cutting.
Ready to plan your cockpit? Compare Focean as one option, map the working zones first, and send a clearly labeled template only after every hatch, drain, margin, and pattern direction has been checked.
Share:
Boat Flooring for Cabin Cruiser Cockpits: A Weather-Ready Planning Guide
Boat Flooring for Flats Boats: A Practical Buyer’s Guide