
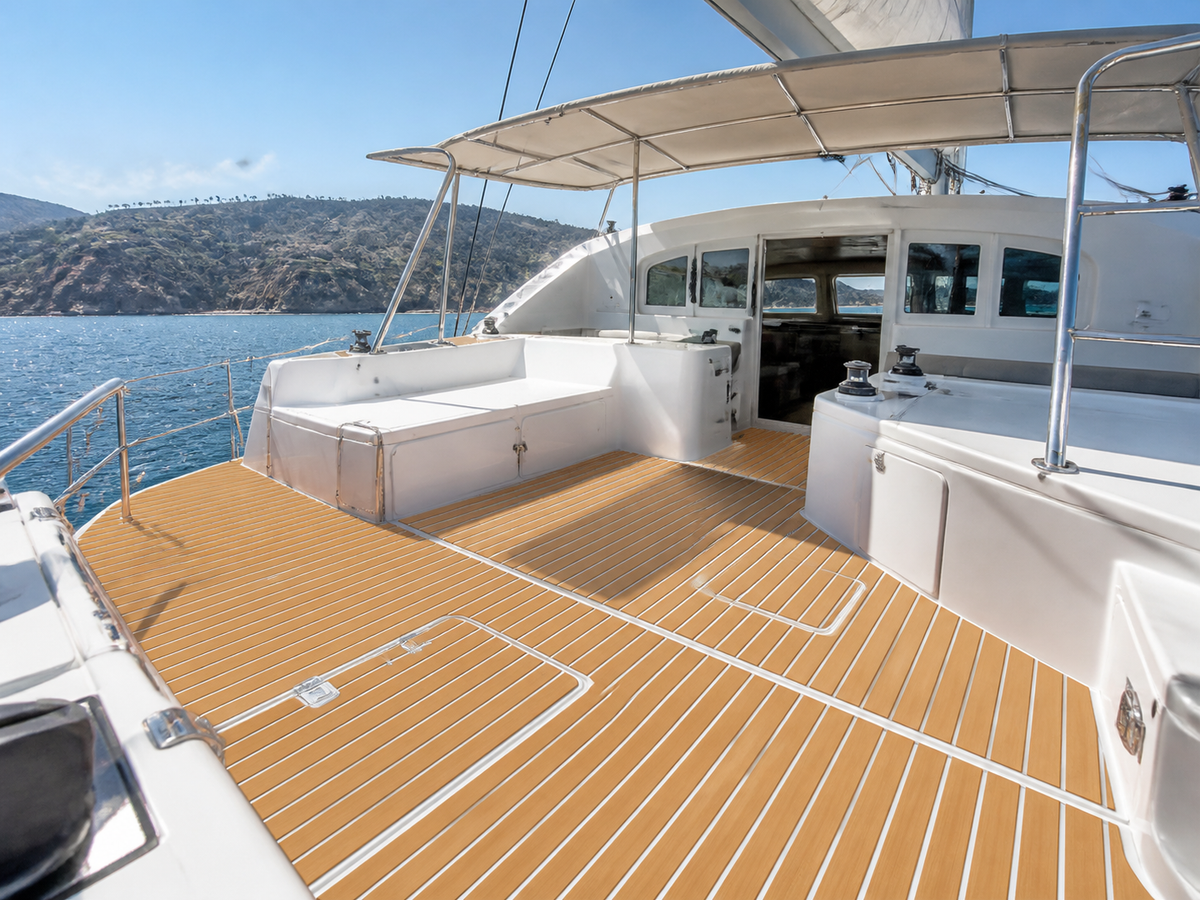
A cruising catamaran can make a flooring project look deceptively simple. The cockpit is broad, the walkways appear open, and large rectangular areas seem easy to cover. In practice, the deck is a network of separate working zones: port and starboard routes, a bridgedeck cockpit, companionway or saloon thresholds, lockers, drains, helm access, and service panels. A layout that ignores those relationships can make future inspection and maintenance harder.
This guide explains how to plan an EVA foam flooring installation on a cruising catamaran before making a final cut or placement decision. It focuses on sheet-material planning, templates, access, panel direction, and dry fitting. Always verify the exact product instructions, boat-builder guidance, substrate compatibility, and installation conditions for the materials you intend to use.
Start with the catamaran as a connected deck system
Do not begin by measuring only the largest open rectangle. Walk the boat from the aft boarding areas toward the cockpit, helm, side decks, and interior threshold. Mark every place where a person changes direction, steps across a seam, opens a locker, reaches a control, or needs service access.
Then divide the project into functional zones. A useful first map may include the aft cross-deck, port and starboard boarding routes, central cockpit, helm approach, seating bases, companionway transition, and individual hatch groups. This gives each panel a job. It also helps you decide where a seam can follow the boat's geometry instead of interrupting a busy route.
Document both sides instead of assuming symmetry
Twin hulls create a strong visual expectation of symmetry, but the usable surfaces may not mirror each other. A fuel fill, locker hinge, drain, seat base, steering component, shore-power connection, or molded radius can change one side. Measure port and starboard independently and photograph each zone from the same angles.
Give every opening and fixed object a simple identifier. For example, label port lockers P1 through P4 and starboard lockers S1 through S4. Put those identifiers on measurements, photographs, and templates. If two shapes really are identical, the records will show it. If they differ, the labels prevent a mirrored cut from reaching the wrong side.
Build a panel map before making templates
A panel map is a top-down sketch showing where one piece ends and another begins. It does not need to be artistic, but it should show traffic direction, hatch outlines, drains, hardware, edges, and the intended orientation of any visible pattern. Number the proposed panels and add an arrow for forward.
Place potential boundaries where they are easy to understand and inspect. Existing molded breaks, furniture bases, changes in deck level, and clear transitions between cockpit and side routes can provide logical reference lines. Avoid placing a narrow strip in a high-use passage simply to consume leftover material. A small saving on the cutting plan may create an awkward visual break or a fragile-looking edge.
For another view of planning panel boundaries around working hardware, see Focean's wake-boat cockpit installation guide. The boat shape differs, but its method of mapping access, traffic, and removable equipment is useful here.
Protect lockers, drains, and service access
Every hatch and service panel should remain recognizable and usable after the flooring is fitted. Record the full movement of each lid, including hinges, latches, gas struts, finger pulls, and the clearance needed at surrounding edges. Do not cover a fastener, identification plate, drain opening, or inspection point merely because it sits inside a convenient rectangle.
Check drainage as a system. Water may cross the central cockpit before reaching an outlet, or each side may have a separate route. Note gutters, scuppers, channels, low points, and threshold details on the panel map. Flooring should not be treated as a way to correct an unknown drainage problem. Investigate unexpected ponding or blocked flow before installation planning continues.
Give thresholds and level changes their own plan
The transition between an outdoor cockpit and an interior saloon or companionway deserves a dedicated template. It may include a door track, sill, sliding panel, drain, rounded corner, or change in surface height. Keep the operating path of doors and screens clear, and follow the boat builder's instructions around tracks and drainage features.
Steps between the cockpit, helm, and side decks also need separate attention. Treat each tread and landing as its own surface rather than wrapping a single pattern through an uncertain edge. Check how the proposed lines look from normal approach angles and whether the edge remains easy to see in the lighting conditions in which the boat is used.
Focean's companionway flooring guide offers a more detailed checklist for thresholds, lockers, drains, and line-handling areas. Use it as a question set, then adapt every dimension to the actual catamaran.
Choose pattern direction across the bridgedeck
Striped or directional surfaces can either organize a wide cockpit or make separate zones feel disconnected. Draw direction arrows on the panel map before cutting. You might align the main cockpit with the boat's fore-and-aft axis while using deliberate breaks at steps or boarding areas. What matters is that the choice is consistent and does not cause a hatch insert to look accidentally rotated.
Test the layout with full-size paper or other suitable temporary templates. View it from the helm, the saloon doorway, both boarding sides, and the aft edge. A line that looks centered from one location may appear offset when seen across the full beam. Photograph each view and compare the pattern through the planned seams.
Create full-size templates with reference information
Make one template per proposed panel or hatch insert. Mark the panel number, port or starboard side, forward direction, neighboring panel numbers, visible pattern direction, and any edge that requires special clearance. Add notes for hinges, pulls, drains, hardware, and areas that must remain uncovered.
Templates should represent the actual boundary, not a guessed rectangle. Trace curves and molded corners carefully using an appropriate method for the boat and temporary material. Refit each template after it is trimmed. It should lie flat without blocking a moving part or hiding an opening. If the project spans several days, store templates flat or in a way that preserves their shape and labels.
Dry-fit every panel as one coordinated layout
Before final placement, position all cut panels and inserts according to the exact product instructions. Confirm that the complete layout works together; approving pieces one at a time can hide a direction change or cumulative alignment error. Inspect seams from several standing positions and open every hatch, door, and service panel that the flooring borders.
Check the port and starboard routes by walking the normal boarding and cockpit paths. Look for narrow slivers, confusing edge shapes, covered fasteners, and panel corners that approach a drain or hinge too closely. If the dry fit reveals a conflict, revise the template or panel map. Do not rely on final placement to correct an unresolved geometry problem.
Hatch-heavy projects benefit from a separate check. Focean's bass-boat hatch installation guide explains how to keep inserts, gaps, pulls, and moving boundaries organized without treating the hatch field as one uninterrupted sheet.
Prepare and place only under exact guidance
Surface preparation, cleaning products, temperature limits, backing, pressure, cure time, and substrate compatibility can vary. Follow the current instructions for the exact flooring and the relevant guidance for the boat's deck surface. Do not transfer a method from a different product because the finished surfaces look similar.
Work in the sequence established by the panel map. Keep labels readable until each piece is confirmed, and protect neighboring areas as required. Pause if you find moisture, contamination, damage, loose hardware, or a surface repair that was hidden during measurement. Those conditions should be understood before the flooring is placed over or beside them.
Run a final access and movement check
After the installation has reached the stage specified by the product guidance, repeat the original walk-through. Approach from both boarding sides, move to the helm, cross the cockpit, use the saloon or companionway, and inspect each level change. Open lockers and service panels and confirm that drains and intended access points remain visible.
Keep the panel map, template labels, product information, and installation photographs with the boat's maintenance records. If a future repair affects one area, that record can identify the panel and nearby boundaries without reconstructing the entire layout from memory.
FAQ
Can I mirror one hull's templates for the other side?
Only after measuring both sides and confirming the shapes, hardware, clearances, and drainage features match. Label port and starboard templates separately even when their outlines appear identical.
Should the pattern run in one direction everywhere?
Not necessarily. The main cockpit may benefit from one dominant direction while steps, hatches, or side routes require deliberate transitions. Plan those changes on the full panel map and judge them from normal viewing positions.
What should I do if the deck holds water during the dry-fit stage?
Pause the project and identify the drainage issue. Do not assume the flooring will solve ponding or a blocked route. Follow the boat builder's guidance or obtain appropriate service advice before proceeding.
Practical takeaway
A successful catamaran flooring installation begins with access and geometry, not with the first cut. Map the connected deck, measure both sides, preserve every moving and service boundary, control pattern direction, and dry-fit the entire layout. When evaluating a Focean option, confirm the exact sheet, backing, compatibility, preparation, placement, and care instructions for the item you are considering. For product-specific questions, contact Focean with clear photographs, boat details, and the zones included in your plan.
Share:
How to Clean Center-Console Boat Flooring After a Saltwater Trip
EVA Foam vs. Marine Vinyl for RIB Cockpits and Boarding Zones