
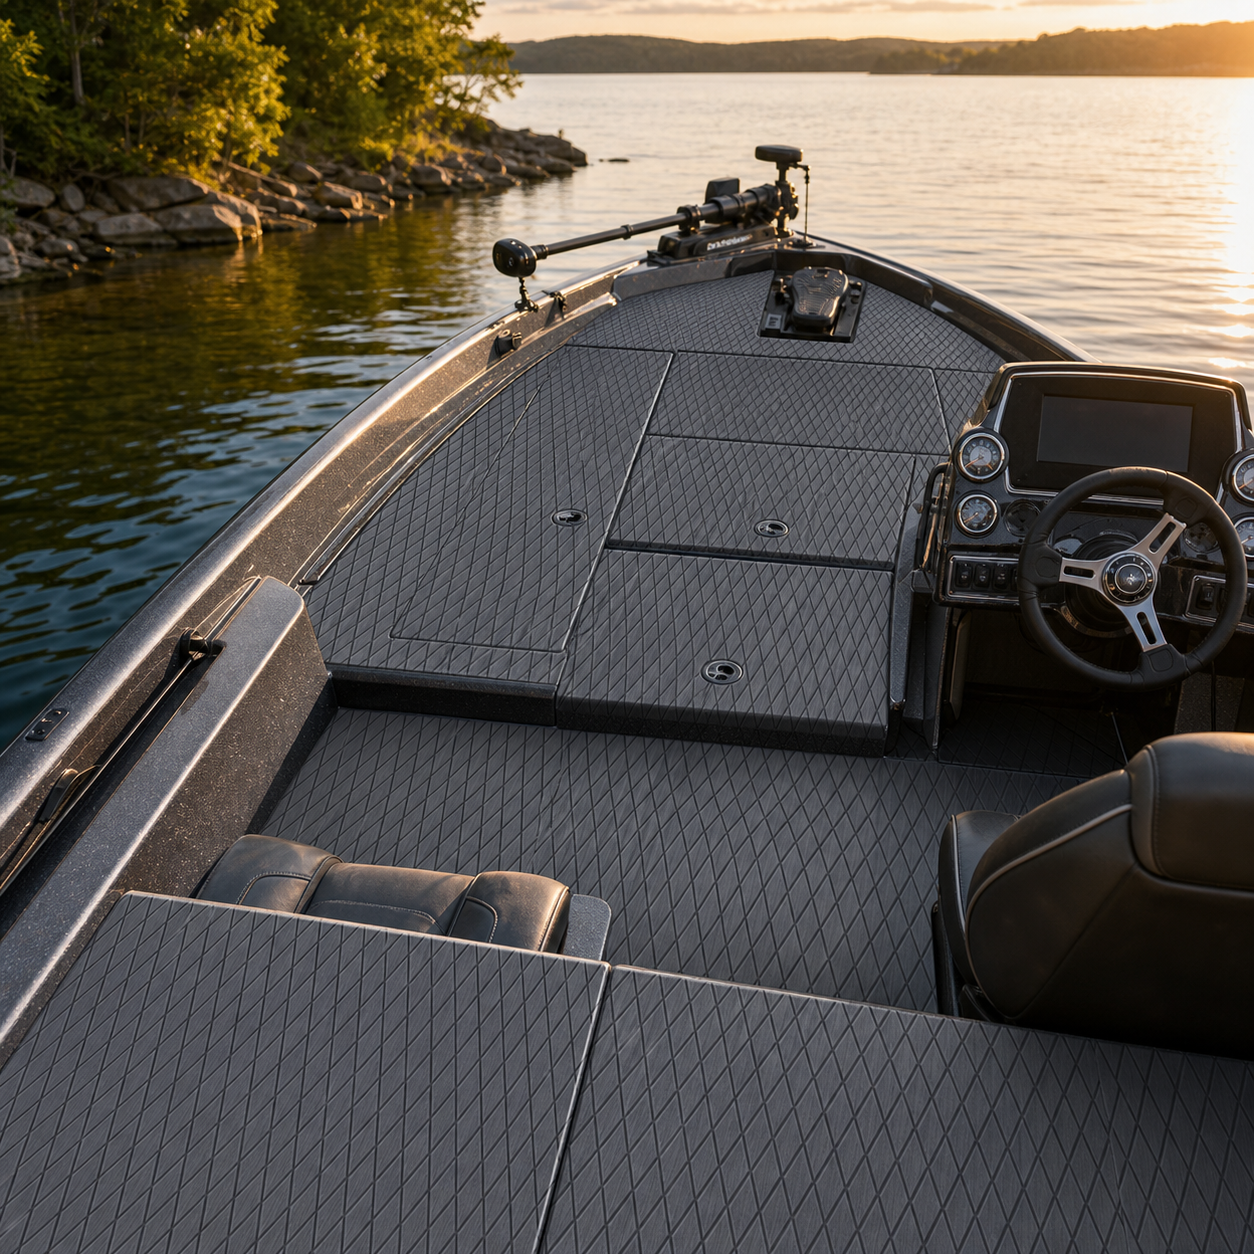
A bass boat deck may look simple from the dock, but it is one of the more demanding layouts to template. The casting deck is often divided by storage lids, livewell access, pedestal bases, drains, hardware, and narrow borders. A flooring plan that ignores those interruptions can create awkward seams, blocked access, or panels that look misaligned even when each piece fits.
The best approach is to treat the project as a layout problem before treating it as an adhesive project. Measure the entire working area, map every moving part, decide how the pattern should flow, and dry-fit every panel before anything is bonded. This guide explains how to plan an EVA foam boat flooring installation on a bass boat without relying on one-size-fits-all dimensions or unsupported product promises.
Start with the way the deck is actually used
Walk through a normal fishing day before making a template. Open every locker. Rotate each latch. Remove and reinstall pedestal seats. Check where rods, tackle trays, landing nets, coolers, and batteries are accessed. Note where people step when moving from the cockpit to the casting deck.
This use check helps separate three kinds of areas:
- High-access zones, including hatch lids, livewells, and frequently used storage.
- Continuous walking zones, such as the center path and the space around the helm.
- Detail zones, including pedestal bases, drains, hinges, latches, and tight corners.
Marking these zones early makes later decisions easier. A seam that is unobtrusive beside a locker may be distracting down the center of a casting deck. A narrow strip that looks tidy on paper may be difficult to place consistently around hardware. Let the boat's workflow guide the panel plan.
Document the deck before removing anything
Take wide photos from the stern, cockpit, and bow, then take close photos of each hatch and fitting. Add temporary labels to the boat or to your notes so that every area has a unique name. A simple sequence such as bow-left locker, bow-center deck, bow-right locker, cockpit-left, and cockpit-right is easier to manage than a folder full of nearly identical images.
Create a rough deck map and record the relationship between neighboring pieces. Measurements are useful, but relationships matter just as much: which edges align, which panels meet at a shared seam, and which hatch opens toward another panel? Include a reference dimension on each template so you can detect accidental scaling during scanning, printing, or digital tracing.
Choose a pattern direction before templating
EVA flooring patterns create visible lines across the deck. On a bass boat, those lines may cross several separate hatch lids. Decide whether the pattern will run bow to stern, follow the boat's centerline, or emphasize another strong visual axis. Then mark that direction on every template.
Do not rotate individual pieces merely to save material without first viewing the complete layout. A single rotated hatch panel can interrupt the visual flow. If material efficiency requires a change in direction, make it deliberate across a defined zone rather than accidental on one lid.
Build templates around moving parts
Use stable template material that lies flat and does not stretch. Cover the target area, secure the template without damaging the surface, and trace the perimeter. For complex shapes, transfer one edge at a time and verify it against fixed reference points.
Hatches require extra attention. The flooring should belong to the lid, not bridge the opening. Trace the lid as its own piece and identify the hinge side. Confirm that the finished edge will not interfere with hinge movement, latch rotation, surrounding trim, or the clearance needed to lift the lid. Repeat the opening test with the paper template in place.
For pedestal bases, drains, deck plates, and other circular fittings, decide whether the flooring will stop around the fitting or whether the fitting can be safely removed and reinstalled. Do not remove hardware unless you understand its fastening, sealing, and structural role. When in doubt, template around it and follow the boat builder's guidance.
Use a dry layout to catch errors
Place every finished template on the deck at the same time. This full dry layout is the most useful quality check in the project. It reveals problems that individual templates hide: uneven borders, wandering centerlines, inconsistent gaps, mismatched pattern arrows, and small pieces that collide when adjacent hatches open.
Test each moving component again. Open lids fully, rotate latches, insert pedestal posts, and check drain access. Look from the normal boarding angle and from the driver's seat. If one panel appears out of alignment, correct the template now. Adhesive should not be used as a substitute for a careful dry fit.
Prepare the surface for the selected flooring system
Surface preparation depends on the deck material, its existing finish, prior adhesives, and the instructions supplied with the selected flooring. Confirm compatibility before starting. The surface should generally be sound, clean, and dry, but the exact cleaner, removal method, and preparation sequence must suit both the deck and the adhesive system.
Remove loose debris first. Address wax, oil, fish residue, old adhesive, and cleaning-product films according to applicable guidance. Avoid using an aggressive solvent simply because it evaporates quickly; it may affect a coating, leave residue, or create unnecessary hazards. Protect drains and compartments from debris, provide ventilation, and follow the safety information for every preparation product.
After cleaning, keep foot traffic off the prepared area. A final inspection under angled light can reveal dust, residue, moisture, or surface damage that was easy to miss from above.
Plan the bonding sequence
Choose an installation order that preserves your exit route and your reference lines. Many projects are easier when the central visual reference is established first, followed by adjoining panels and then smaller detail pieces. Other decks may be better approached zone by zone. The correct sequence is the one that lets you align each new piece to a stable reference without stepping on freshly placed material.
Before exposing any adhesive, position the first piece and use non-damaging alignment marks outside the bonding area. Rehearse how the panel will be held, lowered, and pressed. Large or irregular pieces may be easier to control in stages, but follow the specific installation instructions supplied for the flooring. Do not improvise a bonding technique that conflicts with those instructions.
Place each panel without stretching it. Work methodically, checking the pattern direction, border spacing, and neighboring edges before proceeding. If placement is wrong, stop and consult the applicable correction guidance rather than forcing the panel or assuming it can be repositioned without consequence.
Finish with functional checks
Once the installation has completed the required setting period, inspect every perimeter, seam, cutout, and fitting. Then repeat the same functional test used during templating:
- Open and close every hatch without rubbing or binding.
- Confirm that latches and hinges move freely.
- Keep drains and service access unobstructed.
- Check that pedestal bases and removable components remain usable.
- Verify that no edge creates an unexpected trip point.
Save the labeled templates, deck map, material notes, and photos. They can help if a panel is replaced later or if another section of the boat is upgraded in a future phase.
Common planning mistakes to avoid
Templating only the open deck: Hatch lids and access panels are part of the visual system and need their own plan.
Ignoring pattern arrows: A piece can fit perfectly and still look wrong when its pattern runs against neighboring panels.
Cutting every piece independently: Shared borders should be reviewed together so gaps and lines remain consistent.
Skipping the full dry fit: Testing one template at a time does not reveal how the complete deck will read.
Covering service points: Drains, fasteners, inspection plates, and removable hardware should remain accessible where required.
Assuming all surfaces prepare the same way: Existing coatings, old adhesive, and deck materials can require different methods.
Frequently asked questions
Should hatch lids be covered as separate panels?
Usually, each moving lid should be treated as its own template so the opening remains functional. Confirm hinge, latch, trim, and edge clearances on the actual boat before cutting.
How can I keep the pattern aligned across several hatches?
Mark one shared direction and reference line across the full dry layout. Transfer that reference to every template, then review all pieces together before final cutting or bonding.
Can flooring cover pedestal bases or deck plates?
Do not cover hardware or access points by default. Decide whether the material should stop around each fitting or whether qualified removal and reinstallation is appropriate. Follow the boat builder's and flooring supplier's guidance.
What if my deck has old adhesive or a coated surface?
Identify the surface and residue before choosing a preparation method. Confirm compatibility with the selected flooring system and use the relevant removal and safety instructions.
Practical takeaway
A successful bass boat flooring project begins with a complete hatch-and-hardware map, a consistent pattern direction, and a full-deck dry fit. Treat every moving lid as part of both the visual layout and the boat's working system. Before ordering, confirm the material, backing, compatibility, and current terms for the exact option you are considering.
Focean can help you discuss a project when you provide verified deck photos, labeled templates, surface details, and the intended pattern direction. Contact Focean with that project pack to ask about current options for your bass boat layout.
Share:
How to Clean Boat Flooring in a Motor Cruiser Cockpit
EVA Foam vs. Marine Vinyl for Center-Console Boat Decks