
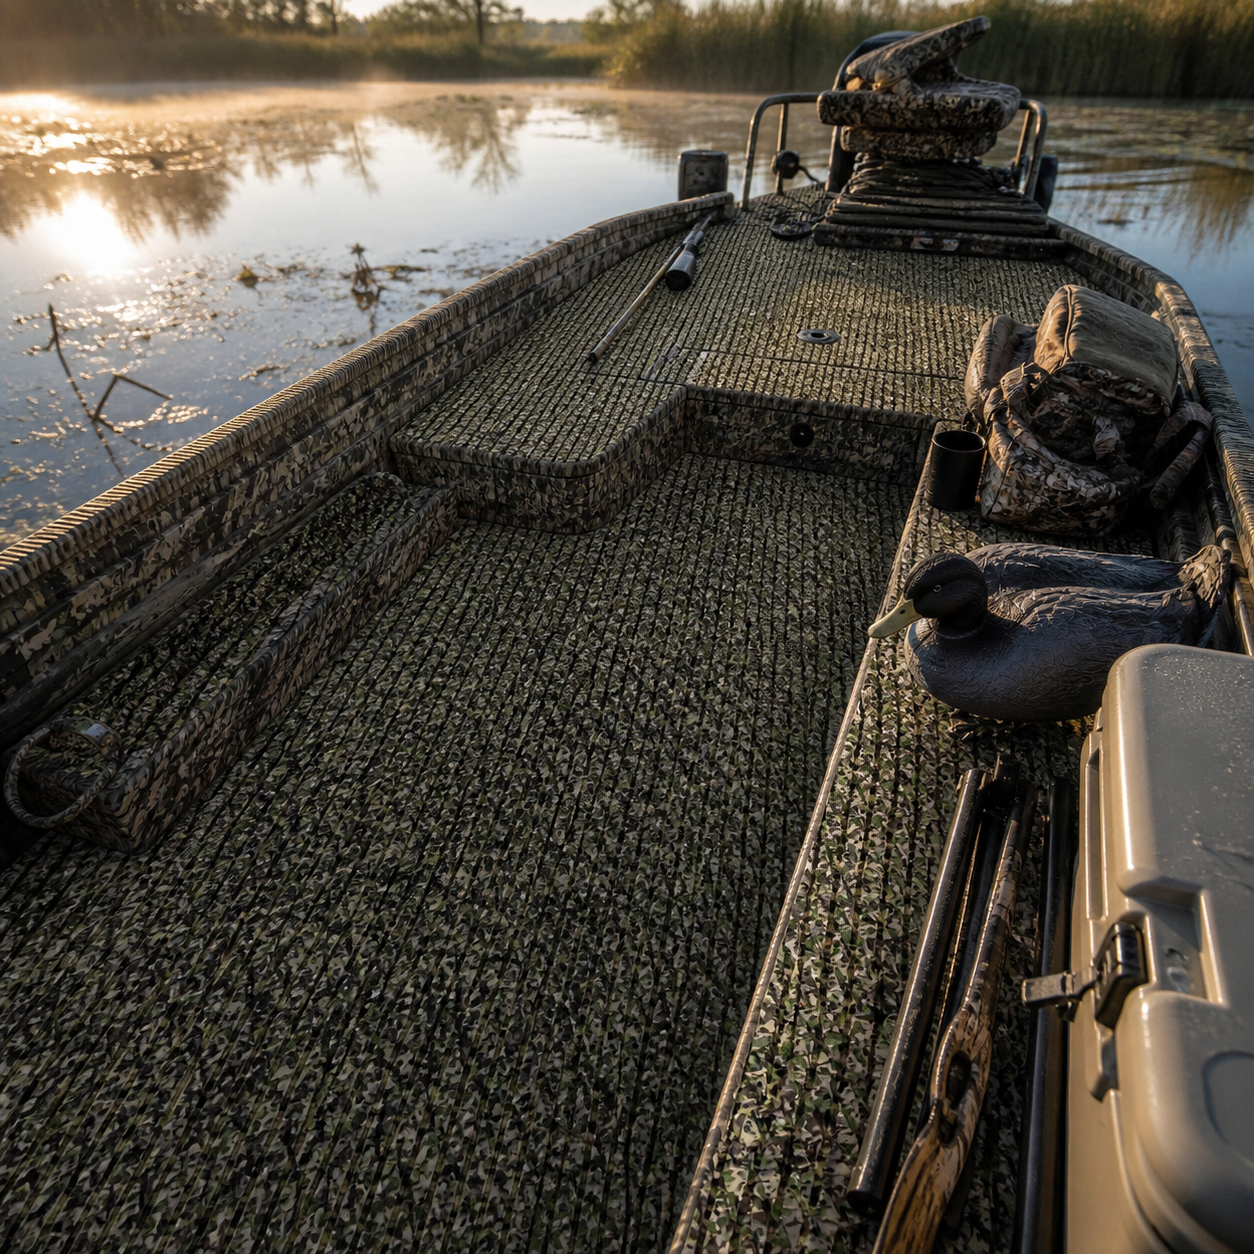
Shallow-water boats are often asked to do several jobs in the same trip. A raised bow may serve as a casting platform, the cockpit may carry tackle and field gear, and the route between them has to stay clear while the boat moves through marshes, backwaters, or quiet coves. A custom flooring plan should respond to those routines instead of treating the deck as one uninterrupted canvas.
This guide explains how to plan custom boat flooring for a shallow-water hunting or fishing boat. It focuses on layout, pattern direction, access, visibility, and cleanup rather than unverified performance promises. Materials and boats vary, so confirm the specifications, backing, installation method, compatibility, and current commercial terms for the exact flooring option you are considering.
Design around the boat's working zones
Begin by dividing the deck according to what happens there. A typical shallow-water layout may include a raised casting deck, a lower cockpit, a narrow transition step, storage hatches, a helm area, and side zones used for rods or bags. Each zone has different movement, access, and cleaning demands.
Walk through a realistic outing before drawing panel lines. Where do you step when boarding? Where does a tackle bag land? Which hatch is opened most often? Where are wet lines, decoys, boots, or fish-handling tools placed? Mark those points on a photo or simple deck sketch. This turns a styling project into a practical map of the boat.
Keep major walking routes visually readable. A dramatic pattern can look appealing in a close-up, yet make hatch outlines or changes in level harder to notice from standing height. Use panel borders, pattern direction, and contrast to help the eye understand the deck rather than disguising its structure.
Map every hatch and service point first
Shallow-water boats often devote much of the visible deck to storage. Hatch lids may hold tackle, batteries, fuel-system access, safety equipment, or anchor gear. Flooring should not conceal a latch, drain, fastener, label, hinge, inspection plate, or removable service panel.
Template each moving part separately from the surrounding deck. Open every hatch through its full travel and check how the edge behaves near adjacent panels. Record the hinge side, latch position, and the clearance required to lift the lid. If a hatch can be removed, preserve the access needed to remove it after the flooring is installed.
Do the same for pedestal bases, tie-down points, drains, trolling-motor hardware, rod holders, console mounts, and wiring access. A clean-looking panel is not a successful panel if a technician must damage it to reach the boat's systems.
Choose pattern direction with the whole deck in view
Pattern direction can make a compact boat look orderly or fragmented. Long visual lines often work best when they follow a clear reference such as the centerline, the main walking route, or the fore-and-aft axis. On raised platforms, align adjacent pieces deliberately so the pattern does not appear to rotate at random around hatch lids.
Camouflage and multicolor designs require an extra check. Small samples emphasize color and texture, but a full deck reveals repetition, seams, and orientation. Review a full-size sample or accurate rendering from the distance at which people normally see the boat. Consider how the pattern interacts with the hull color, seat upholstery, console, gear, and the surrounding environment.
Also think about visibility at dawn, dusk, and under shade. Decorative continuity should not erase a step, hatch edge, or raised platform boundary. If the pattern is visually busy, a restrained border or clear panel outline can help preserve the deck's structure.
Build templates from stable reference points
Boat decks are not always perfectly symmetrical, even when they look symmetrical in photos. Choose stable reference points such as a true centerline, fixed hardware, or molded deck features. Avoid copying one side and assuming it will fit the other without verification.
- Photograph the empty deck. Capture wide views and close-ups of corners, transitions, hardware, and hatch edges.
- Sketch the panel plan. Show separate sections for moving lids, fixed deck areas, steps, and service zones.
- Create labeled templates. Mark bow, stern, port, starboard, neighboring pieces, pattern direction, and every cutout.
- Dry-check each template. Confirm edge spacing, hatch travel, drains, and hardware access on the actual boat.
- Review the complete set together. Look for awkward seams, accidental pattern changes, and narrow pieces that may complicate fitting.
Do not rely on a single overall length and width. Curves, molded channels, console bases, and platform transitions create local variations. If the boat builder or flooring supplier provides a specific templating method, follow that method for the exact application.
Plan for mud, vegetation, and working gear
Backwater and marsh use can bring mud, plant fragments, sand, and organic debris aboard. Flooring selection should account for the approved cleaning method, not just the appearance of a new surface. Ask how the exact material should be rinsed, brushed, dried, and inspected, and whether common onboard contaminants require special treatment.
Layout can simplify cleanup. Avoid creating decorative gaps where debris is likely to collect. Keep drains and channels open. Make sure hatch gutters remain reachable, and preserve access around removable equipment. If bags, decoys, coolers, or tackle boxes regularly slide into one area, plan panel boundaries so they do not interfere with tie-downs or inspection points.
Test any cleaner on an inconspicuous area only when the boat and flooring instructions permit it. A product that is suitable for one surface may affect another finish, adhesive system, or printed pattern. General internet advice is not a substitute for current product-specific care guidance.
Treat traction as more than surface texture
A textured surface can be one part of a traction-focused deck plan, but it does not remove risk. Water, mud, plant residue, fish waste, cleaners, wear, footwear, and boat motion all influence footing. Drainage, housekeeping, handholds, lighting, and careful movement matter alongside the flooring itself.
Keep the path from cockpit to bow free of loose gear. Do not cover handhold mounts, step edges, or changes in level. After installation, inspect the deck in dry and wet conditions and follow the boat and flooring manufacturers' instructions before returning to normal use.
Coordinate color without making unsupported promises
Color is a design decision with practical consequences, but those consequences should be evaluated rather than assumed. Compare candidates in the boat's real lighting. A tone that appears subdued indoors may look brighter in direct sun, while a complex print may lose definition in shade.
Ask for current, product-specific information about color options, care, exposure limits, and replacement matching. Do not assume that every printed or layered material behaves the same way over time. If future panel replacement matters, discuss how pattern alignment and color variation are handled for the selected option.
For a cohesive result, repeat one design logic across the boat: consistent panel borders, deliberate pattern direction, and a limited palette that works with the hull and upholstery. Custom does not have to mean visually crowded.
A practical pre-order checklist
- Identify the exact boat, substrate, intended use, and typical onboard gear.
- Map the casting deck, cockpit, steps, walking routes, and loading areas.
- Document every hatch, drain, fastener, fitting, and service point.
- Confirm full hatch travel and equipment access with dry templates.
- Review pattern direction and panel borders from standing height.
- Evaluate color and visibility in the boat's normal lighting conditions.
- Confirm exact specifications, compatibility, care, and installation instructions.
- Plan how mud, vegetation, sand, and working gear will be removed.
Frequently asked questions
Should the same pattern direction continue across hatch lids?
Usually, deliberate alignment creates a more cohesive appearance, but access and fit come first. Template lids separately, confirm their full movement, and decide how seams and borders will remain visible after installation.
Can flooring cover a raised casting deck and lower cockpit?
That depends on the substrate, transitions, drainage, hardware, and instructions for the exact flooring system. Treat each level as a separate zone, preserve step visibility, and confirm the approved method for edges and changes in height.
Is camouflage flooring suitable for every shallow-water boat?
No design is universal. Consider the boat's use, lighting, hull and upholstery colors, gear, cleaning routine, and the visibility of hatches and steps. Review a full-size sample or accurate rendering before deciding.
What information should I provide when discussing a custom layout?
Share clear deck photos, the boat model, substrate details, labeled measurements or templates, intended use, typical gear, access constraints, and preferred color direction. Ask for the current specifications and instructions that apply to the exact option under consideration.
Practical takeaway
A strong shallow-water boat flooring plan starts with work zones and access. Map how the boat is used, preserve every hatch and service point, align patterns deliberately, and review color in real conditions. The finished layout should make the deck easier to understand without hiding the systems that keep the boat usable.
Focean can be part of that planning conversation. Contact Focean with deck photos, substrate information, labeled templates, intended use, and preferred visual direction to discuss current flooring options and verify the exact specifications, compatibility guidance, care instructions, and commercial terms for your project.
Share:
RIB Boat Flooring in Changing Weather: A Practical Planning Guide
Boat Flooring for Bowriders: A Practical Buyer’s Guide