
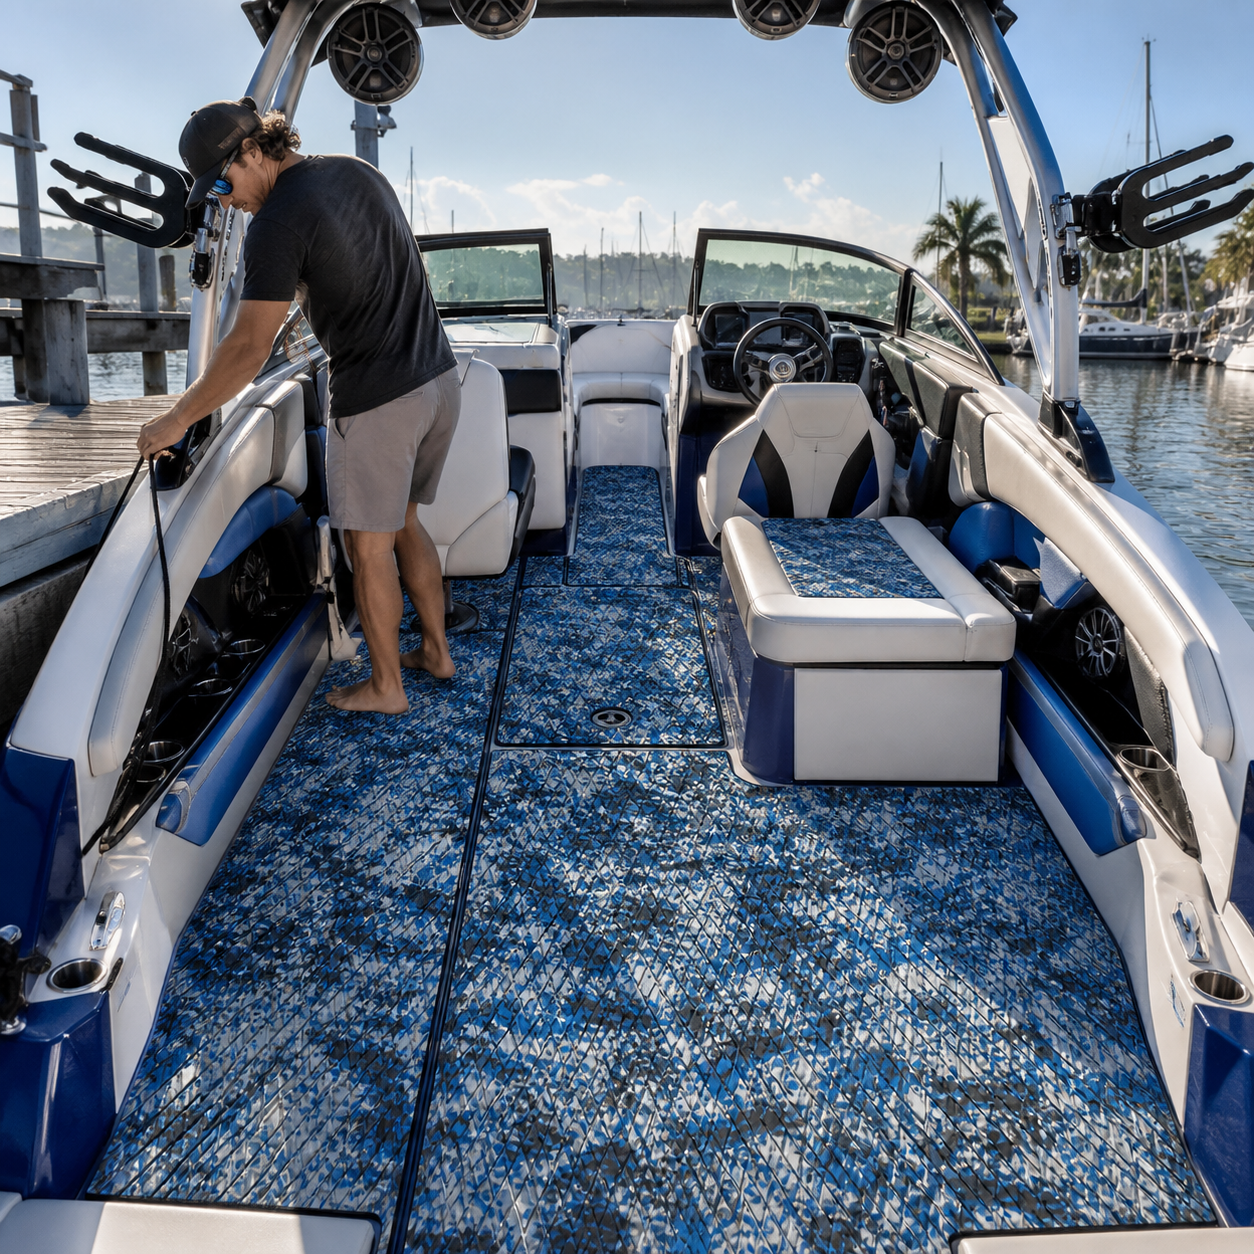
A wake boat cockpit is not a simple rectangle. Seating bases, storage lids, cup holders, drains, tower supports, engine access, and narrow walk-throughs all interrupt the deck. A successful flooring project begins by mapping those interruptions before any material is cut or any backing is exposed.
This guide presents a cautious planning process for a do-it-yourself EVA foam flooring installation in a wake boat cockpit. It is general consumer education, not a replacement for the instructions supplied with a particular boat, flooring product, adhesive system, or tool. Confirm the current requirements for every component you plan to use, and involve a qualified marine professional whenever access, wiring, fuel systems, structure, or safe operation is uncertain.
Start with the boat, not the flooring
Begin while the boat is stable, dry, well lit, and cleared of portable gear. Photograph the cockpit from the stern, bow, and both sides. Then take closer photos of every hatch, drain, fitting, seat base, tower attachment, threshold, and panel boundary. These reference images help when a paper template is no longer sitting on the deck.
Open every lid and access panel. A layout that looks clean when the cockpit is closed can interfere with a hinge, latch, removable cushion, service panel, or engine hatch once it moves. Note which parts lift straight up, which swing across the deck, and which need finger clearance around their edges.
Inspect the existing surface as well. Loose material, damaged coatings, soft areas, persistent moisture, corrosion, or unknown residue should be resolved before installation planning continues. New flooring should not be used to hide a condition that needs diagnosis.
Divide the cockpit into workable zones
Instead of treating the cockpit as one oversized piece, break it into zones that follow the boat’s natural structure. Typical areas may include the main cockpit floor, the space behind the helm, a bow walk-through, side steps, the engine or storage hatch, and smaller panels around seating.
Panel boundaries should make sense visually and mechanically. A seam may align with a hatch edge, centerline, molded break, or another stable reference. Avoid placing a narrow strip where feet pivot, gear slides, or a lid repeatedly crosses the surface. Also consider how a future technician would reach fasteners and service points.
Use removable tape or small paper labels to name each zone. Mark orientation consistently with an arrow pointing toward the bow. This simple system prevents a symmetrical-looking template from being flipped during transfer.
Build a full-size template before cutting
Choose a template material and method permitted by the flooring supplier’s instructions. Lay the template flat without stretching it. Trace the perimeter in short sections, using fixed boat features as references. Around curved seating bases and consoles, make several careful marks rather than forcing one sweeping line.
For hatches, record both the visible lid outline and the clearance required for movement. Mark latch positions, hinges, pulls, drains, and removable fittings. If a component must remain uncovered, label that area clearly. Do not rely on memory to distinguish a cutout from a registration mark.
Reinstall or close movable parts and test the template in normal operating positions. Walk through the cockpit without stepping on loose paper, check access from the helm and seating areas, and confirm that the template does not bridge a gap or conceal a drainage path.
Plan the pattern and panel direction
Texture and pattern direction can make neighboring panels look coordinated or accidental. Mark a grain, stripe, or pattern arrow on every template. Decide whether the visual direction will follow the boat’s centerline, a main walkway, or another consistent feature, then apply that decision across the cockpit.
Dry-lay the uninstalled pieces, when the relevant instructions allow, before committing to placement. Compare seams from common viewpoints: standing at the stern, entering from the dock, sitting at the helm, and looking forward through the walk-through. A small alignment error may be more visible from one of those positions.
Keep visual planning separate from mechanical clearance. A pattern may look continuous across a hatch, but the hatch still needs an independent edge and room to move. Never trade access or drainage for a decorative effect.
Prepare the surface according to exact instructions
Surface preparation depends on the boat substrate, previous coating or adhesive, and the selected flooring system. Follow the current instructions for cleaning, residue removal, permitted tools, environmental conditions, and drying. Do not assume that a household solvent or abrasive is suitable for marine surfaces.
Test the approved preparation method in an inconspicuous location. Protect upholstery, electronics, drains, painted parts, and nearby hardware from dust or liquid. Work with ventilation and personal protective equipment appropriate to the products being used.
After preparation, keep the surface clean. Bare feet, dusty shoes, loose fibers, and fingerprints can reintroduce contamination. Use clean hands or approved gloves and stage tools so they do not have to cross the prepared area.
Dry-fit every panel in sequence
Place each cut panel without exposing adhesive or otherwise committing to installation. Check the perimeter, pattern direction, seam spacing, hatch travel, latch access, drain openings, and clearance around tower supports and seating. Inspect the fit in both open and closed configurations.
Plan an installation sequence that leaves you a clear exit from the cockpit. Large central pieces often affect where smaller panels can be aligned, but the correct order depends on the system. Write the order on the reverse or on a separate map using the same zone names as the templates.
If a panel does not sit naturally during the dry fit, stop. Do not expect adhesive pressure to correct a wrong contour, stretched template, obstructing fastener, or hidden surface problem. Revise the template and repeat the fit check.
Control placement rather than rushing it
When the manufacturer’s instructions call for a peel-and-place process, expose only the amount of backing directed for positioning. Use the approved alignment and pressure method, and avoid pulling or stretching the panel to chase an edge. Stretching can shift the pattern and change how the panel meets nearby hardware.
Work in the planned sequence and inspect each panel before moving on. Confirm that no edge covers a drain, fastener, latch, or service opening. Keep tools away from upholstery and controls, and never work around energized equipment unless the applicable boat and equipment procedures specifically allow it.
If placement goes wrong, follow the product-specific correction guidance. Do not improvise with heat, chemicals, or force. A pause for supplier guidance is safer than turning a small alignment problem into surface damage.
Check function before returning the boat to use
After the required installation steps and waiting conditions are complete, inspect the entire cockpit. Open and close every hatch, move removable seating as intended, operate latches, and verify that drains and service points remain clear. Look along edges from a low angle for trapped debris, misalignment, or areas that need product-specific attention.
Restore gear gradually. Make sure coolers, boards, ropes, and bags do not block access or drag across a newly completed surface. Keep a copy of the product instructions, template map, photos, and installation date with the boat records so future maintenance does not begin from guesswork.
Traction in a moving boat depends on many factors, including water, residue, footwear, maintenance, boat motion, and surface condition. Flooring texture does not replace handholds, clear walkways, suitable footwear, attentive operation, or the boat maker’s safety guidance.
Wake boat cockpit installation checklist
- Photograph all deck zones, hatches, drains, fittings, and access points.
- Resolve damage, moisture, contamination, and loose surfaces before templating.
- Divide the cockpit into panels that preserve movement and service access.
- Mark bow direction and pattern orientation on every template.
- Test every hatch, seat, latch, and walk-through with templates in place.
- Prepare the substrate only with methods approved for the exact surfaces.
- Dry-fit all pieces and write down the installation sequence.
- Keep drains, fasteners, wiring access, and engine-service points unobstructed.
- Complete the required post-installation checks before loading gear.
Frequently asked questions
Should the cockpit floor be one large piece?
Not necessarily. The layout should follow the flooring instructions and preserve access, drainage, hatch movement, and serviceability. Multiple well-planned panels can be more practical than one piece that bridges several moving or removable parts.
Can flooring cover an engine hatch?
A fitted panel may be planned for a hatch only when the boat and flooring instructions support that layout and the hatch remains independently operable. Preserve all required clearances, latches, ventilation, labels, and service access.
How can I keep the pattern aligned across several panels?
Mark a consistent direction on every template, dry-fit the full group, and inspect it from several viewing angles. Check alignment again immediately before each panel is committed to placement.
When should I call a marine professional?
Seek qualified help when the substrate is damaged, moisture is unexplained, the layout affects structure or essential access, wiring or fuel components are nearby, or the exact product instructions do not resolve a fit or preparation question.
Practical takeaway
A wake boat flooring project is won during planning: map moving parts, divide the cockpit into sensible zones, build full-size templates, control pattern direction, dry-fit every panel, and preserve every drain and service point. Careful preparation makes the final installation easier to inspect and maintain.
If you are considering Focean for a wake boat cockpit update, review the current listing for the exact option under consideration. Confirm its listed specifications, compatibility, preparation steps, installation instructions, care guidance, and current terms, then contact Focean with any product-specific questions before ordering.
Share:
How to Clean Bass Boat Flooring Around a Casting Deck
EVA Foam vs. Marine Carpet for Pontoon Decks: How to Choose by Zone